
Main Courses
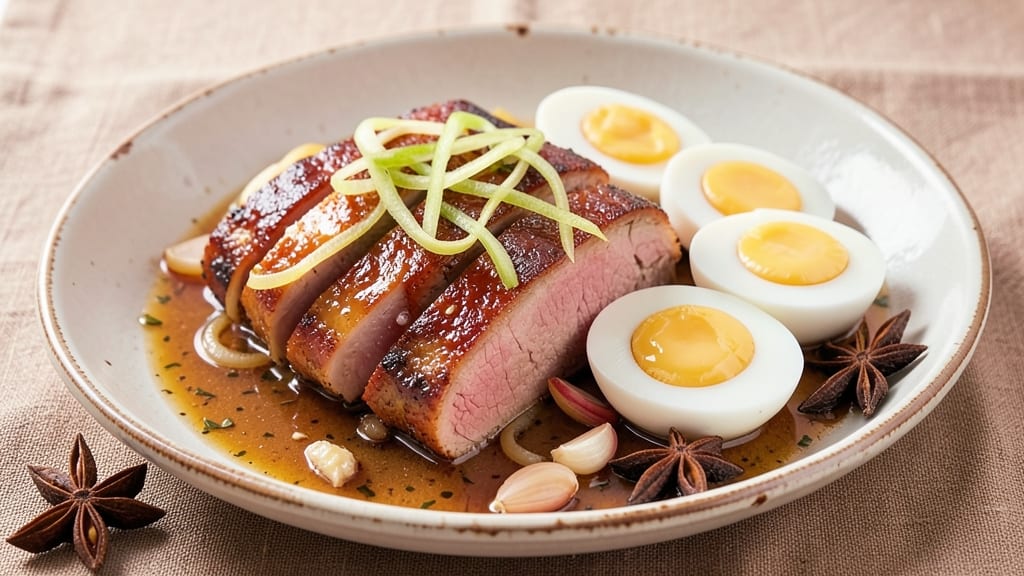
This braised pork and eggs recipe transforms humble ingredients into a restaurant-quality dish that balances rich, silky textures with bold flavors. 🔥 Growing up in Georgia, I learned that slow-cooked pork—tender and infused with aromatic spices—pairs perfectly with eggs poached in its velvety gravy.
The secret lies in braising the pork low and slow, allowing the meat to absorb flavors while developing that signature melt-in-your-mouth tenderness.
What makes this recipe special is the harmony between the two components: the pork, braised until fork-tender, and the eggs, poached in the reduced pork gravy for a silky, custard-like finish.
Unlike traditional stir-fries or quick-cooked dishes, this method relies on patience—letting the flavors meld over time for a depth that’s impossible to rush. The result is a dish that’s both comforting and elegant, perfect for a weeknight dinner or a special occasion.
The technique begins with a simple spice rub and aromatics—garlic, ginger, and star anise—that form the foundation of the braise. As the pork cooks, the liquid reduces into a rich, savory gravy that becomes the perfect medium for poaching the eggs.
Each bite delivers layers of flavor: the tender pork, the creamy egg, and the aromatic gravy working together in perfect balance.
This dish is versatile enough for everyday meals but impressive enough for guests, and it’s a great way to use up leftover pork or a whole cut like pork shoulder. Let’s get started—you’ll want to make this again and again.
Ingredients for braised pork and egg
Rich, aromatic pork meets silky eggs in this soul-warming dish—just 14 ingredients, maximum flavor.
| Ingredient | Amount | Notes |
|---|---|---|
| Pork Shoulder 🐖 | 2 lb | Bone-in for extra flavor |
| Large Eggs 🥚 | 4 whole | Fresh, room temperature |
| Yellow Onion 🧅 | 1 whole | Sliced into half-moons |
| Fresh Garlic 🧄 | 6 cloves | Minced for depth |
| Fresh Ginger 🌿 | 1 tbsp | Grated, aromatic kick |
| Star Anise 🌟 | 2 whole | Lightly crushed |
| Cinnamon Stick 🌳 | 1 whole | For warmth |
| Bay Leaves 🍃 | 2 whole | Fresh preferred |
| Dried Thyme 🌿 | 1 tsp | Or 1 tbsp fresh |
| Black Peppercorns 🌶️ | 1 tsp | Freshly cracked |
| Low-Sodium Soy Sauce 🍶 | 2 tbsp | For umami depth |
| Dry Sherry 🍷 | ½ cup | Or sub apple cider |
| Chicken Stock 🍲 | 2 cups | Homemade if possible |
| Unsalted Butter 🧈 | 2 tbsp | For poaching eggs |
| Sea Salt 🧂 | 1 ½ tsp | Adjust to taste |
The pork shoulder is where all the magic starts—bone-in cuts develop deeper flavor as they braise. Trader Joe's or Costco usually have the best prices, but any grocery store will do. Look for good marbling and ask the butcher to trim excess fat if it's too thick. Star anise and cinnamon are non-negotiable here—they're the secret to that restaurant-quality depth. Penzeys or the spice aisle at Whole Foods have the best whole spices, but the regular grocery store stuff works too. Just make sure they smell vibrant, not dusty.
No sherry? Apple cider vinegar or dry white wine works in a pinch, though sherry's caramel notes are ideal. Fresh thyme is perfect, but dried at one-third the amount gets you close. The soy sauce adds umami—low-sodium is key so you don't over-salt the dish. For the eggs, room temperature is crucial—they poach better when they're not straight from the fridge. Chicken stock? Homemade is ideal, but low-sodium canned stock is fine if you're short on time. Just taste and adjust the salt at the end.
Braised pork keeps beautifully—5 days in the fridge or 3 months frozen. The gravy actually tastes better the next day as flavors meld. For the eggs, poach them fresh in the gravy—they don't reheat well. Store the pork and gravy separately, then reheat gently before adding the eggs. Portion into containers for easy lunches—this dish is perfect for meal prep. The eggs are best made fresh, though, so save those for day-of serving.
Why You'll Love This Recipe
- One-Pan Magic: I swear by this for nights when I’m too tired to scrub a million dishes—just brown the pork shoulder, toss in the onions and garlic, then crack those eggs right into the pan. The pork gets tender while the eggs poach in the same juices. Minimal chopping, zero stress.
- Umami Bomb: That slow-cooked pork shoulder? It’s like a flavor explosion—deep, savory, and rich from the ginger and garlic. Then you crack in those eggs, and suddenly you’ve got a creamy, runny yolk cutting through all that richness. Honestly, it’s the kind of dish that makes you want to take a second helping immediately.
- Weeknight to Dinner Party: Between us, this is my go-to for lazy Mondays and when unexpected guests show up. Serve it with steamed rice and a side of pickled veggies, and suddenly you’ve got a restaurant-worthy meal that still feels effortless. (Yes, even on a Tuesday night.)
- Budget Stretch: Pork shoulder is cheap, eggs are cheap, and a few onions and garlic won’t break the bank. Plus, the leftovers? Even better the next day—reheat the pork with a splash of water, crack in fresh eggs, and boom, instant lunch. I’ve fed my whole family for days on this one recipe.
Step-by-step instructions for braised pork and eggs
Here's how to transform humble pork shoulder into melt-in-your-mouth braise, then poach silky eggs in that golden gravy.
🔥 Step 1: Sear and Braise the Pork Shoulder
Pat the 2 lb pork shoulder dry with paper towels—this ensures maximum browning. Heat a Dutch oven over medium-high heat and add the pork shoulder fat-side down. Let it sear undisturbed for 8-10 minutes until deeply golden brown on all sides. You'll see those gorgeous caramelized patches form—that's where all the flavor hides.
Remove the pork and set it aside. In the same pot, add the sliced 1 whole yellow onion, 6 cloves minced garlic, and 1 tbsp grated fresh ginger. Sauté for 3-4 minutes until the onions soften and become translucent. Here's the thing—don't rush this step. The aromatics need time to develop their flavors before they become part of your braising liquid.
Add the 2 whole star anise, 1 whole cinnamon stick, 2 whole bay leaves, 1 tsp dried thyme, and 1 tsp cracked black peppercorns. Stir everything together for 30 seconds to coat the aromatics with the spices. Pour in the 0.5 cup dry sherry and scrape up any browned bits from the bottom of the pot—this is called deglazing, and it captures all those precious meaty flavors.
🥘 Step 2: Build the Braising Liquid
Return the pork shoulder to the pot, fat-side up. Add the 2 cups chicken stock and bring everything to a gentle simmer over medium heat. The liquid should come about halfway up the pork shoulder. Here's where patience pays off: cover the pot and transfer it to a 325°F oven for 2.5-3 hours. You want the pork to become fork-tender, falling apart easily when you test it with a fork.
About halfway through cooking, check the liquid level. If it's reduced too much, add ¼ cup water to maintain moisture. The pork should be tender enough that when you press it with tongs, it feels like butter. This is the moment that matters: the pork transforms from tough to melt-in-your-mouth delicious through the magic of slow, moist heat.
🍳 Step 3: Poach the Eggs in the Pork Gravy
Once the pork is fork-tender, carefully remove it from the pot and set it aside. Strain the braising liquid through a fine-mesh sieve into a clean saucepan to remove any spices or debris. Return the liquid to medium heat and bring it to a gentle simmer. Here's a pro tip: the eggs will poach best when the liquid is at a gentle simmer, not a rolling boil—think of tiny bubbles breaking the surface, not violent bubbles.
Crack each of the 4 whole large eggs into a small bowl or ramekin. The eggs should be at room temperature for perfect poaching. Gently lower each egg into the simmering liquid, one at a time. The white will firm up in about 3-4 minutes, but don't rush it—you want the yolk to remain runny and silky. Use a slotted spoon to remove the eggs and drain them briefly on paper towels.
🥘 Step 4: Combine and Serve
Return the pork shoulder to the pot with its braising liquid and warm through over low heat for 2-3 minutes. Shred the pork using two forks right in the pot, breaking it into bite-sized pieces. Stir in the 2 tbsp unsalted butter and 1.5 tsp sea salt, adjusting to taste. The butter adds richness, and the salt brings out all the flavors you've built.
To serve, spoon the shredded pork and its rich gravy into bowls. Nestle a poached egg on top of each portion, allowing the runny yolk to blend with the pork and gravy when you take your first bite. Here's the magic: every spoonful delivers tender pork, silky egg yolk, and that complex, aromatic gravy all in one perfect bite. Don't skip the egg—it's what turns this braise into something truly special.
Pro Tips For Making Braised Pork And Egg
- SEAR THE PORK FIRST: High heat for 5-6 minutes until deep golden brown—this locks in flavor before braising. I used to skip it, and the pork just turned out bland. Trust me, the Maillard reaction here is non-negotiable.
- SLICE GINGER THIN: No, "grating" isn’t enough—slice it paper-thin so it infuses without turning to mush. I learned this the hard way when my braise tasted like ginger paste instead of subtle warmth.
- DON’T OVERSTIR THE EGGS: Once the eggs hit the hot pork, leave them alone for 20 seconds before gently folding. Stirring too soon breaks them into scrambled bits instead of silky ribbons. Patience here makes all the difference.
- USE COLD EGGS: Pull them straight from the fridge—cold eggs hold their shape better when they hit the hot pork. I was skeptical until I tried it; now I never use room-temp eggs for this dish.
Dietary considerations for this recipe
Gluten-Free Adaptations
This recipe is naturally gluten-free, but there are a few precautions to take. The chicken stock and soy sauce are potential sources of gluten—opt for certified gluten-free versions. I always keep Annie's Organic gluten-free chicken stock and San-J gluten-free soy sauce on hand.
The eggs and pork are inherently safe, so the focus is just on those two ingredients. 🌱
Low-Carb Options
For a lower-carb version, skip the onions entirely or replace them with ½ cup sliced mushrooms for umami depth. The star anise, cinnamon, and thyme provide plenty of flavor without relying on starches.
I've made this with just the pork, eggs, and aromatics—no onions or mushrooms—and it still tastes incredible. The key is letting the pork's natural sweetness shine through during the long braise.
Dairy-Free Substitutions
The 2 tbsp unsalted butter added at the end is where dairy appears, but it's easy to swap. Use 2 tbsp dairy-free butter like Miyoko's or Earth Balance for the same rich finish.
For extra decadence, stir in 1 tbsp coconut cream instead—it adds a subtle tropical note that pairs surprisingly well with the pork's savory depth. The eggs remain dairy-free, so this adaptation keeps the dish cohesive.
Egg Allergies
If you need to omit eggs entirely, this dish still delivers incredible flavor. Serve the shredded pork with its rich gravy over cauliflower rice or mashed sweet potatoes> for a hearty, egg-free meal.
The gravy's depth comes from the pork's natural juices and reduced aromatics, so it stands well on its own. For extra protein, add crispy tofu> or pan-seared chicken> to the plate.
Protein Boost
Looking to add more protein? Stir in ½ cup cooked lentils> or ½ cup chickpeas> with the pork at the end for a plant-based boost. Both absorb the gravy's flavors beautifully.
For meat lovers, add ½ lb ground pork> or crumbled sausage> to the braise during the final 30 minutes> of cooking. The extra meat will soak up the liquid and develop rich, caramelized edges.
Meal Prep Tips
This dish preps beautifully for meal prep—just store the pork and gravy separately. Reheat the pork and gravy together over low heat> until warmed through, then poach fresh eggs when ready to serve.
The eggs are best made fresh, but you can prep the gravy ahead and keep it in the fridge for up to 5 days>. For extra convenience, make a double batch of pork and freeze half—it reheats just as well the next day. 💡
Nutrition facts
Frequently asked questions
Can I use pork loin instead of pork shoulder for this recipe?
Pork loin is leaner and cooks much faster than pork shoulder, so it won't braise as tenderly. For best results, stick with pork shoulder or pork butt—they have more connective tissue that breaks down beautifully during slow cooking. If you must use loin, cut it into smaller pieces and reduce braising time to 1.5-2 hours.
How do I fix runny eggs when poaching in the gravy?
Runny eggs happen when the gravy isn't hot enough or the eggs cook too long. Keep the gravy at a gentle simmer (tiny bubbles) and poach eggs for exactly 3 minutes for set whites and runny yolks. For firmer yolks, increase to 4 minutes. Always use room-temperature eggs—they poach more evenly.
Can I make this dish in a slow cooker?
Brown the pork in a skillet first, then transfer everything to a slow cooker. Cook on low for 8 hours or high for 5 hours. The eggs should be poached separately in the reduced gravy at the end. The slow cooker method works great for hands-off prep, though oven-braising gives slightly better flavor development.
What can I serve with braised pork and eggs?
This dish pairs perfectly with steamed jasmine rice or buttery mashed potatoes to soak up the rich gravy. For freshness, add a simple cucumber salad with rice vinegar and sesame seeds. The contrast between the creamy eggs and crisp vegetables balances the meal beautifully.
Why did my pork turn out tough instead of tender?
Tough pork usually means it wasn't cooked long enough or the heat was too high. Always braise pork shoulder at 325°F for at least 2.5 hours—it needs time to break down. Check doneness by pressing with tongs: it should feel like butter. If you rushed it, try shredding it finely and using it in tacos or sandwiches where texture matters less.