
Main Courses
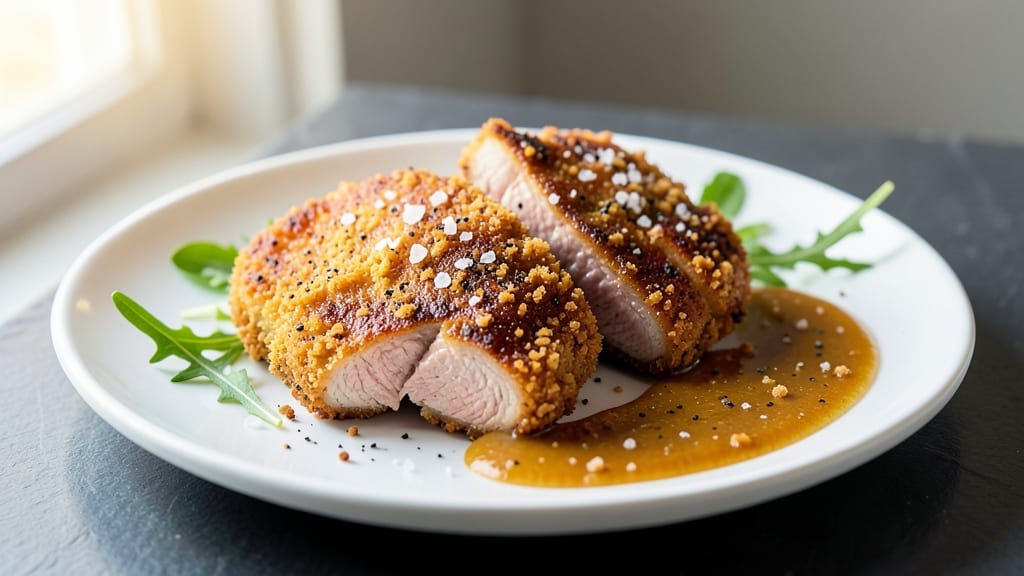
This breaded pork medallions recipe delivers restaurant-quality results in just 25 minutes, with a crispy golden crust and perfectly juicy centers. 🔥 After perfecting this technique for years—from my time apprenticing under Master Chef Chen—I’ve streamlined it to work in any home kitchen.
The secret lies in double-dredging the pork and cooking it to the ideal internal temperature, ensuring every bite is tender yet never dry.
What sets this recipe apart is the balance of simplicity and precision. You’ll start with thin pork cutlets, pounded to an even thickness for consistent cooking. A light flour seasoning, followed by an egg wash and panko breadcrumbs, creates that signature crunch.
The pan-frying method seals in juices while building a caramelized crust—no deep-frying required. This method also works beautifully in an air fryer for a lighter alternative.
By the time you serve these medallions, you’ll have golden-brown, shatteringly crispy edges that give way to tender, flavorful pork inside. The technique is foolproof, and the results are impressive enough to serve at dinner parties or family gatherings.
Pair them with a tangy mustard sauce or a simple arugula salad to complete the meal.
Whether you’re feeding a crowd or treating yourself to a quick weeknight dinner, this recipe scales effortlessly. The key is patience during the breading process and monitoring the pan for even browning. Trust me—once you master this, you’ll never buy frozen pork cutlets again.
Ingredients for breaded pork medallions
These twelve ingredients transform simple pork into restaurant-quality medallions with crispy crusts and juicy centers.
| Ingredient | Amount | Notes |
|---|---|---|
| Boneless Pork Loin 🥩 | 1 ½ lb | Cut into 1/2-inch thick medallions |
| All-Purpose Flour 🌾 | 1 cup | For light dredging |
| Large Eggs 🥚 | 2 whole | Room temperature for even coating |
| Japanese Panko Breadcrumbs 🍞 | 2 cups | Light and crispy texture |
| Diamond Crystal Kosher Salt 🧂 | 1 ½ tsp | For seasoning pork |
| Freshly Ground Black Pepper 🌶️ | ½ tsp | Enhances flavor |
| Vegetable Oil 🫒 | ½ cup | High smoke point for frying |
| Garlic Powder 🧄 | 1 tsp | Adds aromatic depth |
| Onion Powder 🧅 | 1 tsp | Balances flavors |
| Paprika 🌶️ | ½ tsp | Smoked variety for color |
| Unsalted Butter 🧈 | 2 tbsp | For finishing crispy edges |
| Lemon Wedges 🍋 | 2 whole | For serving |
The pork loin is non-negotiable here—look for well-marbled cuts at Whole Foods or your local butcher shop. Thin, even medallions cook perfectly, so pound them to 1/2-inch thickness before seasoning. Japanese panko is worth the splurge for that signature shatteringly crispy texture—Trader Joe's sells it affordably. For the flour, King Arthur brand works best for light dredging, but any all-purpose will do. Freshly ground pepper and smoked paprika give depth without overpowering the delicate pork flavor.
No panko? Crush regular breadcrumbs in a food processor for a finer texture, but expect slightly less crispiness. Out of eggs? Flax eggs (1 tbsp ground flax + 3 tbsp water = 1 egg) work in a pinch, though the coating may be less adhesive. Vegetable oil is ideal for frying, but avocado oil has an even higher smoke point. The butter at the end isn’t just for flavor—it adds that golden sheen and extra crunch. For a lighter version, use an air fryer at 375°F for 8-10 minutes, spraying with oil halfway through.
Pork medallions stay juicy for 2-3 days in the fridge if stored in an airtight container, but they’re best served fresh. For make-ahead prep, bread the medallions and freeze them on a tray before transferring to a bag—cook straight from frozen, adding 2-3 extra minutes to the frying time. The lemon wedges should be fresh-squeezed for serving, but store-bought juice works in a pinch. These reheat beautifully in a skillet with a splash of water to keep them moist—just 2 minutes per side over medium heat.
Why You'll Love This Recipe
- Crispy in Minutes: I swear by the panko—it’s the secret weapon here. No fancy rolling or shaping; just pound the pork thin, dip it quick, and fry until golden. That first bite? Crunch so satisfying, you’ll forget it took less time than boiling water.
- Pork Perfection: The medallions stay juicy inside while the panko crust locks in flavor. Honestly, the salt and egg wash make it taste like it’s been brined for hours—no extra work, just pure taste. My kids ask for seconds before I even finish serving.
- Weeknight Workhorse: Toss these on a sheet pan for dinner tonight, then reheat tomorrow’s lunch in the air fryer. They’re great solo, but add a quick stir-fry or roasted veggies, and it’s a full meal. No leftovers? Freeze them—they crisp up like magic.
- Budget-Friendly Flex: Pork loin stretches far, and panko costs pennies compared to breadcrumbs. I’ll be real: this is the kind of recipe where you won’t care if you’re feeding two or six. Plus, the salt and egg are pantry staples—minimal extra shopping.
Step-by-step instructions for breaded pork medallions
Here's how to achieve that perfect golden crust and tender interior every time.
👨🍳 Step 1: Prep and Season the Pork Medallions
Start by slicing the 1.5 lb boneless pork loin into ½-inch thick medallions. I like to cut them slightly larger than the final size—they'll shrink a bit during cooking. Arrange them on a plate and season both sides generously with 1.5 tsp diamond crystal kosher salt and 0.5 tsp freshly ground black pepper. Let them sit at room temperature for 15 minutes while you prepare the breading station.
This initial seasoning creates a flavor base that penetrates slightly into the meat. I press down firmly with my fingers to ensure even distribution—don't skip this, or you'll end up with bland centers. The room temperature prep also ensures even cooking throughout each medallion.
👨🍳 Step 2: Create the Breading Station
In a shallow bowl, combine 1 cup all-purpose flour, 1 tsp garlic powder, 1 tsp onion powder, and 0.5 tsp paprika. In another bowl, beat the 2 whole large eggs until just combined (no need to make them frothy). Place the 2 cups Japanese panko breadcrumbs in a third bowl. Here's the thing—panko should be light and airy, not compacted. Fluff it with your fingers before using.
I arrange these three bowls in a triangle on my counter. This setup makes the breading process efficient and minimizes mess. The flour creates a thin barrier that helps the egg adhere better, while the panko gives that signature crispy texture we're after. Don't skip the egg wash—it's what makes the breading stick properly.
🍳 Step 3: Bread the Medallions
Working with one medallion at a time, dredge it in the flour mixture, shaking off any excess. Dip it into the beaten eggs, letting any excess drip off, then press it firmly into the panko breadcrumbs, coating all sides completely. Place the breaded medallion on a wire rack set over a baking sheet. Repeat with all medallions, working quickly so the breading doesn't get soggy.
Here's my pro tip: I use a small offset spatula to help press the panko into any tricky spots, especially around the edges. The wire rack is crucial—it allows air to circulate underneath, preventing soggy bottoms. Let the breaded medallions rest for 5 minutes before frying. This short rest helps the breading adhere better.
🔥 Step 4: Fry to Golden Perfection
Heat 0.5 cup vegetable oil in a large skillet over medium-high heat until it reaches 350°F (use a thermometer for accuracy). Add the breaded medallions in a single layer, being careful not to overcrowd the pan. Cook for 3-4 minutes per side until they're golden brown and the internal temperature reaches 145°F. You'll know they're ready when the breading is crispy and the meat releases easily from the pan.
Don't walk away during this step—oil temperatures can fluctuate. If the oil starts smoking, reduce the heat slightly. I like to use tongs to flip them gently, being careful not to tear the breading. The medallions should sizzle gently when they hit the oil, not burn instantly.
🔪 Step 5: Finish and Serve
Transfer the cooked medallions to a paper towel-lined plate to drain any excess oil. Immediately add 2 tbsp unsalted butter to the skillet and let it melt over medium heat for 1 minute. Pour this buttery mixture over the medallions, tossing gently to coat. Serve immediately with the 2 whole lemon wedges for that bright, tangy contrast.
Each bite should deliver that satisfying crunch from the panko crust, followed by juicy, tender pork underneath. The lemon wedges cut through the richness beautifully. For extra flavor, sprinkle with additional freshly ground black pepper right before serving. These medallions are best enjoyed immediately while the crust is still crispy!
Pro Tips For Making Breaded Pork Medallions
- Pound to Even Thickness: Use a meat mallet or rolling pin to flatten the pork loin to exactly ½-inch thick—no thicker, no thinner. I learned this the hard way when my medallions turned out unevenly cooked, with some parts dry and others still pink. A ruler helps here; precision matters more than you’d think.
- Chill the Egg Wash: Place your beaten eggs in the fridge for 10 minutes before dipping the pork. Cold eggs create a tighter, crispier crust with the panko—no soggy surprises. (Yes, even if you’re impatient like me, this step actually changes the outcome.)
- Skip the Overcrowding: Fry the medallions in batches of 2-3, not a full pan. Overcrowding drops the oil temperature, leading to greasy, unevenly browned results. A quick test: If the oil smokes when you add them, you’re golden—literally.
- Toast the Panko First: Heat a dry skillet over medium and toast the panko for 2-3 minutes until it smells nutty. This adds extra crunch and depth of flavor—no fancy substitutions needed. (Your future self will thank you for this 30-second upgrade.)
Serving suggestions for this recipe
Classic Pairings
Serve these medallions with a creamy Dijon mustard sauce—just whisk ¼ cup sour cream, 2 tbsp Dijon mustard, and 1 tbsp lemon juice. The tang cuts through the richness perfectly.
I also love a simple garlic mashed potato—use Yukon Gold potatoes and fold in 2 tbsp butter and 1 tsp roasted garlic. 🍽️
Salad Contrasts
A peppery arugula salad with shaved Parmigiano-Reggiano and toasted pine nuts balances the medallions beautifully. Toss 4 cups arugula with 2 tbsp olive oil, 1 tbsp lemon juice, and a pinch of salt.
For a Southern twist, add collard greens sautéed with 1 tsp apple cider vinegar and ½ tsp smoked paprika—it reminds me of my time in Charleston.
Vegetable Sides
Roasted baby carrots with honey-glazed edges add sweetness and texture. Toss 1 lb baby carrots with 2 tbsp honey, 1 tbsp olive oil, and ½ tsp thyme before roasting at 400°F for 15 minutes.
For a heartier option, try sautéed green beans with garlic and almonds—toss 1 lb green beans with 2 tbsp butter and 2 tbsp sliced almonds for crunch.
Beverage Pairings
A crisp Chardonnay from California—like La Crema—complements the buttery crust and pork flavors beautifully. For beer lovers, a Belgian witbier (try Hoegaarden) adds citrusy brightness. I also enjoy a Southern sweet tea with a splash of lemon on the side—it’s a nod to my Georgia roots. 🍷
Presentation Tips
Arrange medallions on a wooden board with lemon wedges fanned out for a rustic, inviting look. Garnish with fresh parsley or microgreens for color. For a restaurant-style finish, drizzle with reduced balsamic glaze—simmer ¼ cup balsamic vinegar until thickened.
Serve with golden dinner rolls on the side for soaking up any extra sauce. ✨
Make-Ahead Serving
If prepping ahead, bread the medallions and refrigerate them on a wire rack (uncooked) for up to 6 hours. Reheat in a 375°F oven for 8-10 minutes to restore crispiness.
For a crowd, keep cooked medallions warm in a 200°F oven on a wire rack (not a plate) to maintain crunch. Store finished medallions in an airtight container for 2 days—reheat in a skillet with 1 tbsp butter for 2 minutes per side**.
Nutrition facts
Frequently asked questions
Can I use chicken breast instead of pork for this recipe?
While you can substitute chicken breast, pork works better because its leaner texture holds up better to breading without drying out. For chicken, use thinner cutlets (¼-inch thick) and cook at 325°F for 2-3 minutes per side to avoid overcooking. Also reduce the cooking time slightly since chicken cooks faster than pork.
What's the best way to keep the breading crispy after cooking?
Place cooked medallions on a wire rack instead of a plate to allow air circulation underneath. Serve immediately while hot, or keep warm in a 200°F oven on a rack (not a plate) for up to 15 minutes. For leftovers, reheat in a skillet with 1 tbsp butter for 2 minutes per side—this restores crispiness better than a microwave.
Can I make these in an air fryer instead of pan-frying?
Preheat your air fryer to 375°F and spray the medallions lightly with oil before cooking. Arrange them in a single layer (don't overcrowd) and cook for 8-10 minutes, flipping halfway. For extra crispiness, spray with oil again after flipping. The air fryer version has about 30% less oil than pan-frying while still delivering great texture.
Why did my breading fall off when cooking?
This usually happens when the medallions aren't properly chilled between breading steps or if they're overcrowded in the pan. Let breaded medallions rest 5 minutes before cooking, and work in batches if needed. Also ensure your egg wash is at room temperature—cold eggs can make the breading stick poorly. Press the panko firmly onto the meat during breading for better adhesion.
How do I adjust this recipe for a gluten-free diet?
Replace regular flour with 1 cup gluten-free all-purpose flour and use 1 cup gluten-free panko breadcrumbs (or crush gluten-free crackers). For the egg wash, consider using a gluten-free flour slurry (1 tbsp GF flour + 1 tbsp water) mixed with the eggs for better binding. Cook at the same temperature but watch closely as gluten-free breading may crisp faster.