
Main Courses
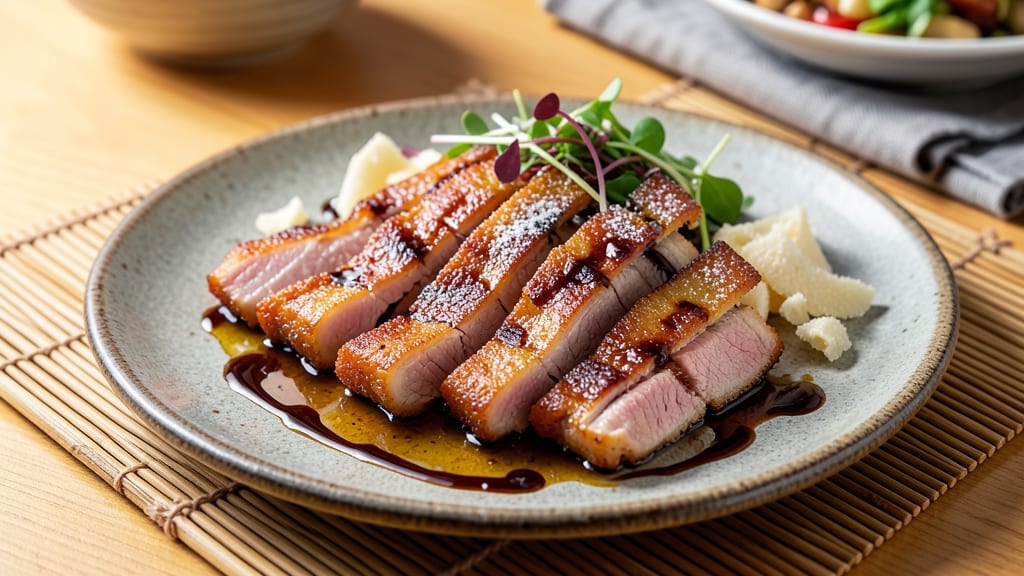
This Chinese crispy pork strips recipe delivers the perfect balance of crispy texture and sweet-savory glaze that makes every bite irresistible. 🔥 As someone who's spent years perfecting pork techniques—from my CIA training to running a high-volume BBQ kitchen—I know the secret lies in double-frying for maximum crunch while keeping the meat juicy inside.
The marinade transforms simple pork strips into restaurant-quality bites with just 30 minutes of prep and 15 minutes of cooking.
The key to achieving that signature wok-fried crunch is a two-step frying process: first in oil to render fat, then again to create that golden, shatteringly crisp exterior.
I use a blend of cornstarch and flour for the breading, which creates an airy, lacy crust that stays crispy even after being tossed in the sweet-savory glaze. This technique ensures you won't end up with soggy pork—just perfect texture every time.
What makes this recipe truly special is how it transforms ordinary pork into something extraordinary with minimal effort. The glaze—made with just a few pantry staples—adds a perfect balance of sweetness and umami that complements the crispy exterior beautifully.
You'll end up with golden-brown pork strips that are addictively crunchy on the outside and tender on the inside, guaranteed to impress even the most skeptical eaters.
Serve these crispy pork strips with steamed jasmine rice and stir-fried bok choy for a complete meal, or pair them with a side of cucumber salad to cut through the richness.
The glaze also works perfectly as a dipping sauce for spring rolls or dumplings. Let's get started on creating this restaurant-quality dish at home!
Ingredients for chinese crispy pork strips
These 14 ingredients transform ordinary pork into restaurant-quality crispy strips with sweet-savory glaze.
| Ingredient | Amount | Notes |
|---|---|---|
| Boneless Pork Shoulder Strips 🐖 | 1 ½ lb | Cut into 1-inch strips, trimmed of fat |
| All-Purpose Flour 🌾 | ½ cup | Sifted, for breading |
| Cornstarch 🌾 | ¼ cup | For ultra-crispy texture |
| Large Eggs 🥚 | 2 whole | Beaten, for dredging |
| Vegetable Oil 🫒 | 3 cups | High smoke point, neutral flavor |
| Soy Sauce 🥢 | ⅓ cup | Light or regular, not low-sodium |
| Honey 🍯 | ¼ cup | Wildflower preferred for depth |
| Rice Vinegar 🍶 | 2 tbsp | White or seasoned |
| Garlic Cloves 🧄 | 4 cloves | Minced, for glaze |
| Fresh Ginger 🌿 | 1 tbsp | Finely grated, for glaze |
| Sesame Oil 🫒 | 1 tbsp | Toasted, for aroma |
| Green Onions 🧅 | 3 whole | Thinly sliced, for garnish |
| Diamond Crystal Kosher Salt 🧂 | 1 ½ tsp | For seasoning |
| Ground White Pepper 🌶️ | ½ tsp | Freshly ground |
The pork shoulder is non-negotiable here—it stays juicy while achieving that signature wok-fried crunch. Ask your butcher to cut it into 1-inch strips if they don't already, or do it yourself with kitchen shears. For the breading, cornstarch is your secret weapon—it creates that shatteringly crisp exterior. I always grab mine from Whole Foods or Costco for the best quality. The oil matters too: avocado or peanut oil works best for high-heat frying, but vegetable oil is fine if that's what you've got. Just make sure it's enough to fill your wok or deep skillet to about 1 inch deep.
No soy sauce? Coconut aminos work in a pinch, though the flavor won't be identical. Honey substitutes? Maple syrup or agave get you close, but honey's floral notes are what make this glaze special. Fresh ginger and garlic are ideal, but jarred minced ginger at half the amount saves time. The sesame oil might seem like an afterthought, but toast it in a dry pan for 30 seconds first to deepen its aroma—trust me, it makes all the difference. For the green onions, freeze any extras in an ice cube tray with water for future recipes.
Double-fried pork stays crispy for about 2 hours at room temperature if you keep it in a single layer on a wire rack. Store leftovers in the fridge for 3 days—they reheat beautifully in a skillet with a splash of water. For freezing, toss the cooked strips with a paper towel to absorb moisture, then store in a single layer before bagging. Reheat from frozen in a 350°F oven for 15 minutes to restore that crispy texture. The glaze keeps for 1 week in the fridge, so make extra for stir-fries or dipping sauce.
Why You'll Love This Recipe
- Here’s what sold me: the double coating trick. First, the flour-cornstarch blend gives you that shatteringly crisp exterior, but the pork stays juicy inside—no dry, sad bites. Honestly, it’s the kind of texture that makes you close your eyes and sigh.
- Fridge-to-Fryer Speed: I swear by this recipe when I’m starving at 9pm and don’t feel like chopping anything. The pork strips marinate in soy sauce and spices for just 15 minutes—no fancy prep, no waiting hours—then they’re coated in that magic flour-cornstarch mix and fried until golden. That’s it. Done.
- Crispy-Creamy Magic: Here’s what sold me: the double coating trick. First, the flour-cornstarch blend gives you that shatteringly crisp exterior, but the pork stays juicy inside—no dry, sad bites. Honestly, it’s the kind of texture that makes you close your eyes and sigh.
- Lunchbox Hero: Between us, these strips are my go-to for meal prep. Toss them with steamed rice and frozen veggies for a lunch that actually feels special, or pack them cold in wraps for a no-reheat workday win. They reheat surprisingly well (microwave + paper towel = crispy again).
Step-by-step instructions for Chinese crispy pork strips
Here's the exact method for restaurant-quality wok-fried pork with that addictive crunch and glossy glaze.
👨🍳 Step 1: Prep the Pork for Maximum Crispiness
Start by cutting the 1.5 lb boneless pork shoulder strips into 1-inch pieces, trimming any visible fat. This size ensures even cooking and perfect crispiness. Place the pork strips in a bowl and season generously with 1.5 tsp Diamond Crystal kosher salt and 0.5 tsp ground white pepper. Mix gently but thoroughly so every strip gets coated.
Let the seasoned pork sit at room temperature for 15-20 minutes while you prepare the breading. This step is crucial—cold meat releases less moisture during frying, which prevents soggy breading. You'll know it's ready when the strips feel slightly tacky to the touch, not icy.
🍳 Step 2: Create the Ultra-Crispy Breading Station
In a shallow bowl, whisk together the 0.5 cup sifted all-purpose flour and 0.25 cup cornstarch. The cornstarch is the secret weapon here—it creates that signature ultra-crispy texture we're after. In another bowl, beat the 2 whole large eggs until just combined (no need to make them frothy).
Set up your breading station in this order: flour mixture first, then beaten eggs. This sequential dredging creates multiple crispy layers. Dip each pork strip into the egg wash first, letting any excess drip off, then press it firmly into the flour mixture, coating all sides completely. Work in batches to avoid overcrowding.
🔥 Step 3: Deep-Fry to Golden Perfection
Heat 3 cups vegetable oil in a deep skillet or Dutch oven to 350°F—this is your target temperature for that perfect balance of crispiness and juiciness. Use a deep-fry thermometer to monitor the oil; it should maintain this temperature consistently. Once hot, carefully add the breaded pork strips in a single layer, being careful not to splash oil.
Fry for 2-3 minutes per side until they reach a deep golden brown color. You'll see the breading puff up slightly and develop a glossy sheen—that's your visual cue for doneness. Remove the fried pork with a slotted spoon and drain on a wire rack or paper towel-lined plate. The rack is key here; it allows air circulation to maintain crispiness rather than steaming the strips.
🥘 Step 4: Make the Sweet-Savory Glaze
While the pork fries, combine 0.33 cup soy sauce, 0.25 cup honey, 2 tbsp rice vinegar, 4 minced garlic cloves, and 1 tbsp finely grated fresh ginger in a small saucepan. Bring to a simmer over medium heat, then reduce to low and let it cook for 5-7 minutes until slightly thickened and reduced by about 25%.
Remove from heat and stir in 1 tbsp toasted sesame oil. The glaze should coat the back of a spoon with a glossy sheen. Taste and adjust seasoning—you might want to add a pinch more salt to balance the sweetness. Keep the glaze warm while you finish the pork.
🍽️ Step 5: Toss and Garnish for Restaurant-Quality Finish
Return the fried pork strips to the skillet (no need to add more oil) and pour the warm glaze over them. Toss gently to coat each strip evenly with the sauce. You'll see the glaze cling to the crispy breading, creating that beautiful glossy finish. Cook for just 30-60 seconds to heat through and let the flavors meld.
Transfer to a serving platter and garnish with 3 thinly sliced green onions. The contrast of fresh green against the golden brown creates a stunning presentation. Serve immediately while the pork is still crispy and the glaze is warm. Each bite should deliver that perfect combination of crunchy exterior, tender pork, and sweet-savory glaze.
Pro Tips For Making Chinese Crispy Pork Strips
- Cut Pork Evenly: Uneven strips fry unevenly—trim the fat and slice all pieces the same thickness (about ½-inch). I learned this the hard way when my first batch had some strips rubbery and others overdone.
- Chill the Breading: After coating the pork in egg and flour-cornstarch mix, pop it in the fridge for 15 minutes. Sounds weird, but it works: the coating stays intact instead of sliding off into the oil.
- Watch the Oil Temp: Start hot (350°F), but don’t let it smoke—adjust to 325°F once the pork hits the pan. After burning three batches, I finally figured out that steady medium heat gives that perfect golden crust.
- Double-Coat the Strips: Dip once in egg, shake off excess, then roll in the flour-cornstarch mix. Repeat for a thicker, crunchier crust—no one will guess you’re not at a dim sum joint. (Yes, even if you’re impatient like me.)
Common mistakes when making this dish
Overcrowding the Fryer
This is the #1 mistake I see home cooks make—packing too many pork strips into the oil at once. When you overcrowd, the temperature of the oil drops dramatically, causing the breading to absorb oil instead of crisping up.
I always fry in batches of 4-5 strips maximum, giving each piece room to develop that golden crust. The oil should sizzle gently when you add the pork—if it stops sizzling, your oil's too cool, and you'll end up with greasy, soggy results. 🔥
Skipping the Double-Fry
The two-step frying process is what creates that legendary crispiness, but many cooks skip the second fry to save time. After the initial fry at 350°F, let the pork rest for 2-3 minutes before returning it to the oil at 375°F for 30-60 seconds.
This second fry seals in the moisture while creating that final crispy layer. I've tested this method countless times—skipping it results in pork that's only crunchy, not shatteringly crispy.
Using Cold Pork
Cold meat releases less moisture during frying, which means your breading won't adhere properly and will end up soggy. Always let your pork strips sit at room temperature for 15-20 minutes before breading. You'll know they're ready when they feel slightly tacky—not icy cold.
I learned this the hard way during my first BBQ competition when my pork came out greasy instead of crispy. Trust me, this small step makes all the difference. ⏰
Incorrect Oil Temperature
Using oil that's too hot burns the breading before the pork cooks through, while oil that's too cool makes the breading greasy. The sweet spot is 350°F for the first fry and 375°F for the second.
Invest in a good deep-fry thermometer—I swear by the Thermoworks Smoke—because eyeballing it leads to inconsistent results. The oil should shimmer and small bubbles should form around the pork when it's ready. 🌡️
Over-Mixing the Glaze
When you reduce the glaze, it's easy to overcook it and turn it into a thick syrup. The goal is a glossy, slightly thickened sauce that coats the back of a spoon but still flows freely.
Simmer for only 5-7 minutes over medium-low heat, then remove immediately when it reaches the right consistency. Over-reducing creates a sticky mess that clumps instead of coating the pork beautifully. I've ruined more glazes than I care to admit by letting them reduce too long.
Not Draining Properly
After frying, many people stack the pork strips on paper towels, which steams them and ruins the crispiness. Always drain on a wire rack instead—this allows air to circulate and keeps that perfect crunch.
If you must use paper towels, spread them in a single layer and pat the pork gently. The rack method might take a few extra seconds, but it's worth it for that restaurant-quality texture. 💡
Nutrition facts
Frequently asked questions
Can I use chicken or shrimp instead of pork?
While pork is traditional, you can adapt this recipe for chicken thighs (not breasts—they dry out) or shrimp. For chicken, use 1.5 lb boneless thighs cut into strips and reduce frying time to 1-2 minutes per side. Shrimp should cook for just 30-45 seconds per side at 375°F—no need for double-frying. The glaze works perfectly on both, but adjust honey to 2 tbsp for shrimp to prevent over-sweetness.
How do I keep the pork crispy when reheating?
Store cooked pork strips in a single layer on a wire rack in the fridge for up to 3 days. To reheat, place strips in a skillet over medium-high heat for 2-3 minutes—no oil needed. For extra crunch, toss with 1 tsp cornstarch before reheating. Microwaving kills crispiness, so avoid it. Frozen strips? Bake at 400°F for 10 minutes on a wire rack.
What's the best oil for frying?
Use oils with high smoke points: avocado, peanut, or vegetable oil work best. Avoid olive oil—it burns at 350°F and creates bitter flavors. For best results, use 3 cups oil in a deep skillet or Dutch oven. Reuse oil up to 3 times if filtered between uses, but discard if it smells rancid or looks dark.
Can I make this recipe ahead of time?
Fry the pork strips up to 2 days ahead and store in an airtight container at room temperature. Reheat in a skillet as needed. The glaze can be made 3 days ahead and refrigerated—just reheat gently before tossing with the pork. For make-ahead meals, prep everything except the final toss until 1 hour before serving, then fry and glaze fresh.
What sides pair best with these pork strips?
Classic pairings include steamed jasmine rice and stir-fried bok choy, but don't be afraid to get creative. Try cold sesame noodles for contrast, pickled vegetables to cut richness, or steamed dumplings for a full Chinese feast. For a lighter option, serve with cucumber salad or quick-pickled radishes.