
Sauces & Condiments
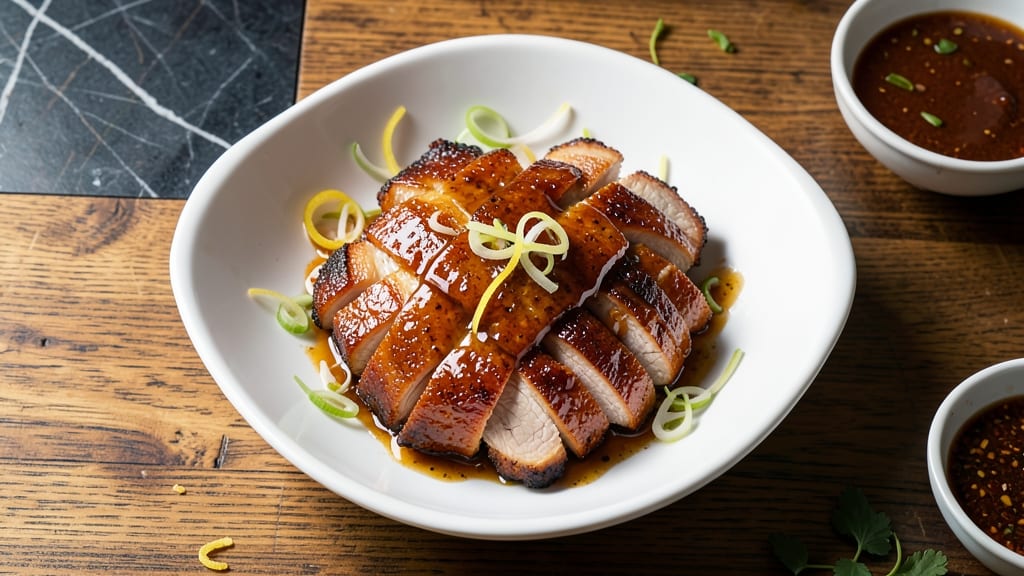
This Chinese glazed pork belly recipe delivers the perfect balance of crispy five-spice crust and silky, glossy glaze that makes every bite unforgettable. After mastering the technique in Charleston kitchens, I've refined it to ensure tender meat that renders its own fat while developing that signature caramelized exterior.
The secret lies in slow roasting followed by a quick glaze that locks in moisture and creates that signature shine.
The process begins with a dry rub of five-spice powder and salt, creating a fragrant crust that gives way to melt-in-your-mouth pork.
What sets this recipe apart is the two-stage cooking method: first roasting the pork belly until the fat renders and the meat reaches perfect tenderness, then finishing with a sticky-sweet glaze made from honey, soy sauce, and a touch of rice vinegar.
This technique ensures the pork stays juicy while developing that irresistible caramelized flavor.
By the time you slice into this dish, you'll have perfectly crispy edges with tender, fatty meat underneath, all coated in a glossy glaze that's both sweet and savory.
The aroma alone will have your kitchen smelling like a Cantonese restaurant, and the texture contrast between the crispy exterior and tender interior makes each bite worth savoring. This recipe is perfect for special occasions or when you want to impress guests with authentic Chinese flavors.
Whether you're serving it as the centerpiece of a feast or enjoying it as a standalone dish, this glazed pork belly delivers restaurant-quality results at home. The key is patience—letting the pork cook slowly so the fat renders properly and the meat becomes fork-tender.
With this recipe, you'll achieve that perfect harmony of textures and flavors that makes Chinese cuisine so beloved.
Ingredients for chinese glazed pork belly
Pork belly, five-spice magic, and a glossy honey glaze—everything you need for restaurant-style Chinese flavors at home.
| Ingredient | Amount | Notes |
|---|---|---|
| Pork Belly 🥓 | 2 lb | Skin-on, cut into 1-inch thick slices |
| Five-Spice Powder 🌶️ | 2 tbsp | Authentic Chinese blend preferred |
| Kosher Salt 🧂 | 1 ½ tbsp | Diamond Crystal preferred |
| Honey 🍯 | ½ cup | Wildflower or clover preferred |
| Light Soy Sauce 🥄 | ¼ cup | Kikkoman preferred |
| Rice Vinegar 🍶 | 1 tbsp | Seasoned preferred |
| Fresh Ginger 🧄 | ½ cup | Grated, peeled |
| Garlic Cloves 🧄 | 6 cloves | Peeled, minced |
| Sesame Oil 🫒 | 1 tbsp | Toasted, for finishing |
| Toasted Sesame Seeds 🌾 | 1 tbsp | For garnish |
| Neutral Oil 🫒 | 2 tbsp | Avocado or vegetable oil |
| Green Onions 🧅 | 3 whole | Sliced, for garnish |
The pork belly is non-negotiable here—look for thick-cut, skin-on pieces from the butcher section. Costco or Whole Foods usually carry the best quality, but your local Asian market might have even fresher cuts. Five-spice powder is the soul of this dish—buy it from an Asian grocery store (the blends there are far superior to anything in regular supermarkets). If you can't find it, mix 1 tsp each of cinnamon, star anise, fennel, cloves, and Szechuan peppercorns. The honey should be raw and unfiltered—the darker varieties add depth to the glaze. For the soy sauce, Kikkoman is your friend, but any light soy will work in a pinch.
No five-spice powder? Mix your own (see above) or use 1 tbsp each of cinnamon and ginger powder plus 1 tsp cloves. Short on honey? Maple syrup works beautifully—just reduce the liquid by 10% since it's thicker. The rice vinegar can be swapped for apple cider vinegar, but it'll lack that authentic tang. Fresh ginger and garlic are ideal, but powdered works at half the amount if you're in a hurry. The sesame oil is just for finishing—don't cook with it or it'll turn bitter. For the oil, avocado oil has the highest smoke point, but any neutral oil will do.
Pork belly keeps beautifully—wrap tightly in parchment and refrigerate for up to 5 days. The glaze components (honey, soy, vinegar) can be pre-mixed and stored in the fridge for 1 week. For leftovers, reheat in a 350°F oven for 10 minutes to crisp up the skin again. This dish reheats like a dream—even better the next day once all those flavors meld together. Portion into containers with the glaze on top to keep everything sticky and delicious.
Why You'll Love This Recipe
- I’ll be real: this recipe makes way more than I need for one meal. The good news? The pork belly stays just as incredible reheated—slice it thin for fried rice, cube it for noodles, or serve it cold in buns. My lunchbox gets a serious upgrade for days, and it’s still the star of the show.
- One-Pan Magic: Honestly, I love recipes that don’t require a million dishes—this one’s all about that crispy, sticky goodness on a single sheet pan. Toss the pork belly in five-spice and salt, roast it until golden, then baste with honey and soy. Flip it over, glaze it again, and boom—done. No chopping, no stress, just hands-off perfection while you sip your tea.
- Sweet-Savory Obsession: Between us, that balance of honey’s caramelized bite and soy’s umami depth? It’s dangerously addictive. The five-spice powder adds this warm, earthy depth that makes every bite feel like a little flavor party. Not too sweet, not too salty—just right, with that crackling crust you can’t resist.
- Leftovers That Shine: I’ll be real: this recipe makes way more than I need for one meal. The good news? The pork belly stays just as incredible reheated—slice it thin for fried rice, cube it for noodles, or serve it cold in buns. My lunchbox gets a serious upgrade for days, and it’s still the star of the show.
Step-by-step instructions for Chinese glazed pork belly
Here's how to transform fatty pork belly into crispy, aromatic perfection with a glossy five-spice glaze.
Cure and Rest the Pork Belly
Pat the 2 lb pork belly dry with paper towels—this is crucial for crispy skin. In a bowl, combine the 2 tbsp five-spice powder and 1.5 tbsp kosher salt, then rub this mixture all over the pork belly, pressing it into the fat and meat. The spices will penetrate while resting, creating that signature aromatic crust.
Place the seasoned pork belly on a plate, fat-side up, and refrigerate uncovered for 24 hours. This drying process concentrates the flavors and ensures maximum crispiness. Real talk: Skipping this step means soggy skin—don't skip it (I learned the hard way). After 24 hours, the surface should feel dry to the touch and the pork belly will shrink slightly.
Render the Fat and Crisp the Skin
Remove the pork belly from the fridge and let it sit at room temperature for 30 minutes. Preheat your oven to 375°F and line a baking sheet with foil. Place the pork belly fat-side down on the sheet and bake for 45 minutes. This slow cook allows the fat to render out gradually, creating a protective layer that bastes the meat as it cooks.
After 45 minutes, flip the pork belly fat-side up and increase the oven temperature to 425°F. Bake for another 30-45 minutes until the skin is deep golden brown and crispy enough to crack when pressed. You'll know it's ready when the skin pulls away from the fat in sheets—this is the moment that matters. If it's not crispy enough, return it to the oven for another 10 minutes.
Prepare the Glaze
While the pork belly crisps, make the glaze by combining the 0.5 cup honey, 0.25 cup light soy sauce, 1 tbsp rice vinegar, 0.5 cup grated fresh ginger, and 6 minced garlic cloves in a saucepan. Bring to a simmer over medium heat and cook for 10-12 minutes, stirring occasionally, until the mixture reduces by about half and thickens slightly. The glaze should coat the back of a spoon and have a syrupy consistency.
Remove from heat and stir in the 1 tbsp toasted sesame oil. This step adds depth of flavor and a nutty aroma that complements the five-spice crust. Taste and adjust seasoning with a pinch more salt if needed. The glaze should be sweet, tangy, and slightly salty—this balance is key to the final dish.
Glaze and Finish
Carefully transfer the crispy pork belly to a cutting board and let it rest for 10 minutes. This resting period ensures the juices redistribute, making each slice juicy and flavorful. While it rests, pour the prepared glaze over the pork belly, coating it evenly on all sides. Let it sit for 5 minutes to absorb the glaze.
Return the pork belly to the oven (now at 350°F) for 10-15 minutes to set the glaze and infuse the flavors. You'll see the glaze caramelize slightly, creating a glossy finish. Remove from the oven and let it rest for another 10 minutes before slicing. This final rest is non-negotiable—it guarantees tender, juicy meat that doesn't fall apart when sliced.
Slice and Garnish
Slice the pork belly into ¼-inch thick pieces against the grain for maximum tenderness. Arrange the slices on a platter and drizzle any remaining glaze over the top. Sprinkle with 1 tbsp toasted sesame seeds and 3 sliced green onions for a pop of color and freshness. Serve immediately while the pork belly is still warm and the glaze is glossy.
Each bite should deliver a perfect balance of crispy skin, tender meat, and a sweet-savory glaze that's aromatic with five-spice and ginger. This dish is incredible hot or at room temperature, so it's perfect for meal prep—just reheat gently in the oven to maintain crispiness. Trust me, your taste buds will thank you!
Pro Tips For Making Chinese Glazed Pork Belly
- CRACK THE SKIN FIRST: Pork belly’s fat layer is stubborn—score the skin in a crosshatch pattern before salting, then press firmly with your palm to render fat evenly. I learned this the hard way after ending up with a greasy mess instead of crispy edges. Use a sharp knife, not a dull one—this isn’t the time for heroics.
- SALT LIKE YOU MEAN IT: Five-spice powder is flavorful, but kosher salt is the real MVP here. Generously coat the pork belly both sides and let it sit uncovered in the fridge for at least 4 hours (or overnight if you’re not in a rush). The salt needs time to work its magic—skipping this step means bland, soggy skin.
- GLAZE IN STAGES: Don’t dump the entire honey-soy glaze at once—it’ll burn before the pork cooks through. Start with a thin layer of light soy sauce and five-spice powder, sear the pork until deeply browned, then brush on the honey mixture in the last 5 minutes. This two-step approach keeps the glaze sticky and glossy, not charred.
- REST IT UNDER FOIL: The moment the pork hits 145°F (160°F for extra crispiness), transfer it to a foil tent for 10 minutes. This traps heat and renders fat back into the meat, making every slice juicy. I know, I know—you want to cut into it immediately. But resist. The difference is night and day.
Essential equipment for perfect results
Oven Essentials
Your oven is the star of this recipe, so invest in a quality thermometer—I swear by the Thermoworks Smoke for accuracy. Preheat your oven to 375°F for the initial render, then crank it up to 425°F for crisping.
A heavy-duty baking sheet (like All-Clad Stainless Steel) prevents warping, and parchment paper makes cleanup effortless. 🌡️
Crispy Skin Tools
For that signature crackling skin, use a meat thermometer to monitor internal temperature—aim for 145°F in the thickest part. A tongs with silicone grips (like OXO Good Grips) makes flipping the pork belly easier without tearing the skin.
I also recommend a wire cooling rack to drain excess fat during the final crisping phase.
Glaze Prep Gear
Small but mighty: a saucepan with tight-fitting lid (I use All-Clad Stainless Steel) for reducing the glaze evenly. A fine-mesh strainer removes ginger and garlic bits if you prefer a silky finish.
For garnishing, keep toasted sesame seeds and green onions prepped in small bowls—this keeps your workspace organized during the final touches.
Cutting Board Must-Haves
Slice against the grain with a sharp chef's knife (my go-to is Wüsthof Classic) and a cutting board with non-slip feet (like John Boos Maple).
A meat slicer isn't necessary, but if you're ambitious, a Dexter-Russell 12-inch makes short work of thick cuts. Always slice at a 45-degree angle for presentation.
Fat Management Tools
Rendered fat is liquid gold—keep a fat separator (or a large measuring cup) nearby to collect it for future cooking. A baster (like OXO Good Grips) helps baste the pork belly with its own fat during roasting.
For cleanup, paper towels and a spatula are essential for wiping down the baking sheet between batches.
Nutrition facts
Frequently asked questions
Can I substitute pork belly with another cut of pork?
While pork belly is ideal for its fat content and texture, you can use pork shoulder (like Boston butt) in a pinch. Trim excess fat and marinate it longer (48 hours) to mimic the belly's tenderness. The skin won't crisp as dramatically, but the meat will still be flavorful. For best results, use a thin-cut pork loin and bake it uncovered to create a light crust.
How do I make the glaze ahead of time?
You can prep the glaze ingredients 1 day ahead and store them separately in the fridge. Combine everything 2 hours before cooking to let the flavors meld. For a fully made-ahead glaze, reduce it completely, cool it, and store in an airtight container for up to 1 week. Reheat gently in a saucepan before applying to the pork belly.
Why did my pork belly skin turn rubbery instead of crispy?
This usually happens when the pork wasn't dried properly before cooking or the oven temperature was too low. Always pat the pork belly thoroughly dry and let it rest uncovered in the fridge for 24 hours. For crispiness, ensure your oven reaches 425°F and use a wire rack to allow air circulation. If it's still not crispy, broil for 2-3 minutes at the end.
Can I use this recipe for a vegetarian version?
While pork belly is the star, you can adapt this technique for tofu or mushrooms. Use extra-firm tofu pressed for 30 minutes, coated in five-spice powder, and roasted until crispy. For mushrooms, slice shiitake caps thickly, marinate in soy sauce and spices, then roast. The glaze works beautifully on both—just reduce cooking time by half.
How do I reheat leftovers without losing crispiness?
Reheat in a 350°F oven for 10-15 minutes on a wire rack to restore crispiness. For a quick fix, use the broiler on high for 2-3 minutes, watching closely to avoid burning. Store leftovers in the fridge for 4 days or freeze for 3 months. The glaze stays sticky but delicious—just reheat gently to maintain texture.