
Main Courses
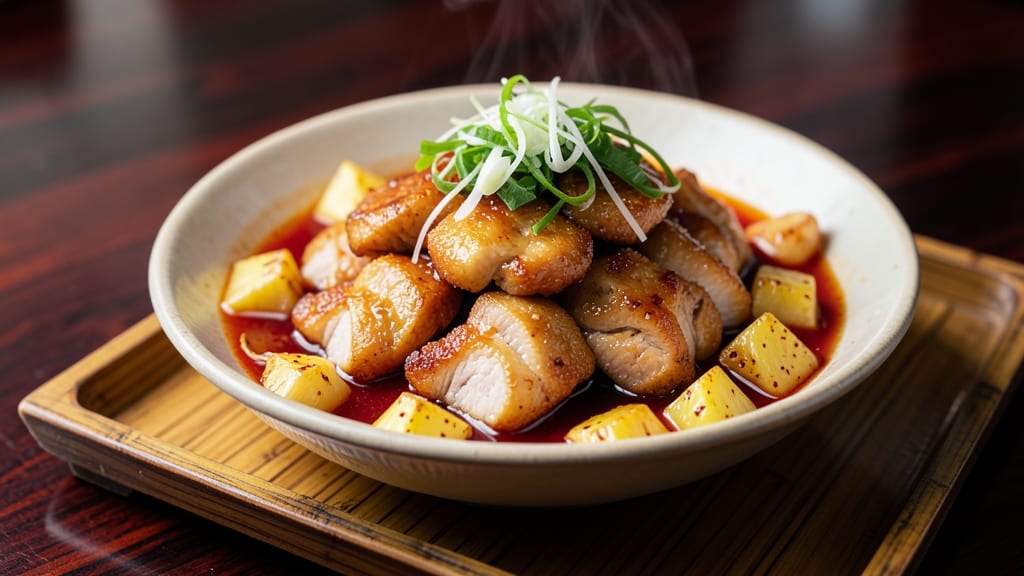
This Chinese-style sweet and sour pork recipe delivers the perfect balance of crispy, golden pork bites and a tangy, slightly sweet pineapple glaze that’s impossible to resist. 🔥 The secret lies in double-frying the pork for that signature crunch while marinating it in a simple soy-ginger blend to lock in flavor.
I’ve perfected this Cantonese classic over years of testing, ensuring every bite is both restaurant-quality and foolproof at home.
The magic happens in the sauce—a vibrant mix of ketchup, vinegar, and pineapple juice that creates a glossy, sticky glaze with just the right amount of sweetness and acidity. This isn’t your childhood takeout version; it’s a refined take that still keeps the dish approachable for weeknight dinners.
The pork stays tender inside while developing a crispy exterior that holds up perfectly to the sauce.
By the time you’re done, you’ll have a dish that’s as visually stunning as it is delicious—golden pork pieces glistening under a bright red-orange sauce, ready to be served over steamed rice or noodles.
The aroma alone will have everyone gathering around the table, and the first bite delivers that perfect contrast of textures and flavors.
Whether you’re feeding a crowd or treating yourself to a homemade favorite, this recipe scales beautifully and comes together in under an hour. The technique is straightforward, but the results are undeniably impressive—proof that even classic dishes can feel fresh and exciting when made with care.
Ingredients for chinese style sweet and sour pork
Crispy pork bites and tangy glaze—just 16 ingredients for restaurant-quality flavor at home.
| Ingredient | Amount | Notes |
|---|---|---|
| Pork Shoulder 🐖 | 1 ½ lb | Cut into 1.5-inch cubes |
| All-Purpose Flour 🌾 | ½ cup | For dredging pork |
| Cornstarch 🌾 | ¼ cup | For extra crispiness |
| Soy Sauce 🍶 | ¼ cup | Light or regular variety |
| Sesame Oil 🫒 | 1 tbsp | Toasted sesame oil preferred |
| Fresh Ginger 🌿 | 1 tbsp | Finely grated |
| Garlic Cloves 🧄 | 4 cloves | Minced |
| Ketchup 🍅 | ½ cup | Heinz preferred |
| White Vinegar 🍶 | ¼ cup | White or apple cider |
| Pineapple Juice 🍍 | ½ cup | Fresh or canned |
| Granulated Sugar 🍚 | ¼ cup | White or brown sugar |
| Vegetable Oil 🫒 | 2 cups | For frying |
| Green Bell Pepper 🧅 | ½ cup | Diced, optional garnish |
| Red Bell Pepper 🧅 | ½ cup | Diced, optional garnish |
| Salt 🧂 | 1 tsp | Kosher or sea salt |
| Black Pepper 🌶️ | ½ tsp | Freshly ground |
The pork shoulder is key—look for well-marbled cuts at Costco or Whole Foods for the best texture. Cutting it into even 1.5-inch cubes ensures consistent cooking. Trader Joe's often has pre-cut pork shoulder, but if buying whole, ask the butcher to cube it. For extra crispiness, toss the cubes in cornstarch instead of flour—it makes all the difference. The ginger and garlic should be fresh; dried just won’t give that bright, zesty kick this dish needs.
No sesame oil? Toasted peanut oil works in a pinch, but sesame is non-negotiable for that authentic aroma. Short on pineapple juice? Coconut water or extra ketchup stretches it out, but the acidity from vinegar keeps the glaze balanced. The bell peppers are optional but add a pop of color—red and green together look stunning over the finished dish. For a quicker version, skip the double-frying and just pan-fry once, though it won’t be quite as crispy. The sauce can be made ahead and reheated—it actually tastes better the next day once the flavors meld.
Store leftover pork in an airtight container for 3-4 days—it reheats beautifully in a skillet with a splash of water. The sauce keeps for 5 days in the fridge, and both can be frozen for 3 months. I always double the sauce because it’s perfect over rice or noodles. For a crowd, scale up the pork by 50%—just make sure your oil is hot enough to handle the extra volume. The cornstarch mixture can be prepped ahead and refrigerated for 1 day to save time on cooking day.
Why You'll Love This Recipe
- One-Pan Magic: I swear by this recipe on nights when I’m too tired to wash extra dishes. The pork gets tossed in flour and cornstarch, then fried until golden—no flipping required—while the sauce simmers in the same pan. That sesame oil finish? Just a drizzle, and suddenly it tastes like a restaurant dish.
- Tangy Crunch: The sauce is where this dish shines: sweet pineapple, vinegar, and a touch of soy sauce balance out the crispy pork. That cornstarch coating? It’s the secret—crunchy outside, tender inside, with a sticky-sweet glaze that’s dangerously addictive. (Yes, even on a Tuesday night.)
- Leftover Hero: This recipe actually improves the next day. The pork stays juicy, and the sauce thickens just enough to cling to every bite. I’ll be real: I make double portions on purpose, then reheat it for lunch with rice or toss it into noodles. Zero waste, all flavor.
- Budget Stretch: Pork shoulder is cheap, and the ingredients won’t break the bank. A little soy sauce, a splash of vinegar, and that jar of pineapple you already have? Boom—dinner for four for under $15. Plus, the leftovers feed me for days, so it’s basically free money in my book.
Step-by-step instructions for Chinese style sweet and sour pork
Here's how to make restaurant-style sweet and sour pork with perfectly crispy pork bites and that signature tangy glaze.
👨🍳 Step 1: Prepare the Pork for Double-Crispy Texture
Cut the 1.5 lb pork shoulder into 1.5-inch cubes—keep them uniform for even cooking. In a large bowl, combine the 0.5 cup all-purpose flour and 0.25 cup cornstarch, then add the 1 tsp salt and 0.5 tsp black pepper. Toss the pork cubes in this mixture until fully coated, shaking off any excess.
Here's the trick: Let the coated pork rest for 15 minutes at room temperature. This step is crucial—it helps the coating adhere better and creates that extra-crispy texture we're after. While it rests, heat 2 cups vegetable oil in a deep skillet or Dutch oven to 350°F. You'll know it's ready when a wooden chopstick inserted into the oil bubbles steadily.
🔥 Step 2: Fry the Pork Until Golden and Crispy
Working in batches (don't overcrowd the pan!), carefully add the pork to the hot oil. Fry for 4-5 minutes until the pork is golden brown and the coating is crispy. Use a slotted spoon to transfer the cooked pork to a paper towel-lined plate to drain excess oil.
Keep the oil at 350°F between batches—if it drops below 325°F, the pork will absorb too much oil and become greasy instead of crispy. This first fry is what gives your sweet and sour pork that satisfying crunch. Don't rush this step; the pork needs to develop that golden crust.
🍳 Step 3: Make the Tangy Pineapple Glaze
In the same skillet (with just the pork drippings remaining), add 1 tbsp sesame oil over medium heat. Once shimmering, add the 1 tbsp finely grated fresh ginger and 4 minced garlic cloves, cooking for 30 seconds until fragrant. Pour in the 0.25 cup soy sauce, 0.5 cup ketchup, 0.25 cup white vinegar, 0.5 cup pineapple juice, and 0.25 cup granulated sugar. Stir well to combine.
Bring the mixture to a boil, then reduce heat to medium-low and let it simmer for 5-7 minutes until it thickens slightly and coats the back of a spoon. You want the sauce to be glossy but still pourable—not too thick or it'll be gluey. Taste and adjust seasoning if needed, adding a pinch more sugar for sweetness or vinegar for tang.
🥘 Step 4: Finish the Pork in the Glaze
Return the crispy pork to the skillet with the sauce. Toss everything together and cook for 2-3 minutes until the pork is evenly coated and heated through. The residual heat will help the sauce cling beautifully to each piece. If the sauce starts to thicken too much, add 1-2 tablespoons water to loosen it.
For that classic restaurant presentation, transfer the pork to a serving platter. Garnish with 0.5 cup diced green bell pepper and 0.5 cup diced red bell pepper if you like. The colorful peppers add freshness and contrast against the rich pork and glossy sauce. Serve immediately while the pork is still crispy and the sauce is warm.
Pro Tips For Making Chinese Style Sweet And Sour Pork
- VELVEET THE PORK: I learned this the hard way—pork shoulder needs a good 20-minute simmer in water with a pinch of baking soda (yes, really) to tenderize it before cutting. Skip this, and your pork will turn to mush when frying or stay chewy. Trust me, the extra 20 minutes now save you from dry, sad bites later.
- DOUBLE-DUST THE CUTS: Mix 1 part cornstarch to 3 parts all-purpose flour for your coating—cornstarch makes the crust crispier, but too much can burn. Pat the pork dry first (yes, even if you’re impatient like me), then toss it in the flour mix twice with a shake in between. The second coat locks in that golden crust.
- WATCH THE HEAT: Start frying the pork on medium-high, but immediately drop to medium when the first piece hits the pan. Too hot, and your crust burns before the inside cooks; too low, and you’ll steam the pork instead of searing it. A thermometer reading 350°F (175°C) works best—I know, I know, but trust the process.
- SAVE THE FRYING OIL: After frying the pork, don’t pour that golden oil down the drain—strain it into a jar and save it for the sauce. Just 2-3 tablespoons of that crispy oil tossed into your sweet-and-sour sauce adds depth and richness that store-bought oil can’t match. (Your future self will thank you.)
Regional styles of chinese style sweet and sour pork
Cantonese Roots
This dish traces back to Cantonese cuisine, where sweet and sour flavors first became iconic. The original version used pork belly instead of shoulder, deep-fried until blistering and tossed in a sauce with hard-boiled eggs and water chestnuts.
I remember my first time eating it in a Hong Kong dim sum spot—the sauce was sticky-sweet with just a hint of vinegar, and the pork was so crispy it crunched like a potato chip. 🌶️
True Cantonese versions often include dried shrimp or Chinese sausage in the sauce for umami depth. For authenticity, use light soy sauce (like Lee Kum Kee) and rice vinegar instead of white vinegar.
The dish was originally served as a dim sum or luncheonette staple, meant to be quick yet impressive.
Modern Twists
Contemporary versions often swap pork for chicken or shrimp, but purists insist pork shoulder delivers the best texture. I’ve seen creative takes with pineapple chunks in the sauce (like this recipe) or even mango for a tropical twist.
The key is balancing the sweetness—some modern versions use honey instead of sugar, while others add a splash of sriracha for heat. 🍍
Restaurant chains like P.F. Chang’s popularized a sweeter, thicker sauce, while authentic spots keep it tangier and glossier. For a fusion approach, try adding lime zest to the sauce or serving it over jasmine rice with a side of pickled cucumbers for that restaurant-style contrast.
Hong Kong vs. Taiwan
Hong Kong’s version leans lighter on sugar, using more vinegar for brightness, while Taiwan’s tends to be sweeter and thicker. In Taiwan, you’ll often find bamboo shoots in the sauce, adding a subtle crunch.
I once made both versions side by side—the Hong Kong style had a sharper bite, while the Taiwanese sauce was almost caramelized. 🗺️
For a regional twist, add douchi (fermented tofu) to the sauce for a funky, salty depth (common in Fujian-style dishes). Or, for a Sichuan-inspired version, finish the pork with chili oil and scatter crushed Sichuan peppercorns on top.
Vegetarian Adaptations
Swap pork for tofu or mushrooms—king oyster mushrooms hold up best to frying. Use aquafaba (chickpea brine) to mimic the crispy texture of pork. For the sauce, add mushroom powder or soy sauce to deepen the umami.
I’ve had amazing versions with lotus root or daikon radish for crunch. 🌱
For a vegan glaze, replace pineapple juice with apple cider vinegar and maple syrup, then add a splash of soy sauce and rice vinegar. The texture stays glossy, and the tangy-sweet balance remains intact. Garnish with sesame seeds or scallions for color.
Nutrition facts
Frequently asked questions
Can I use chicken or shrimp instead of pork?
Chicken thighs work beautifully—they stay tender when fried and absorb the sauce well. For shrimp, use large, peeled shrimp and reduce the frying time to 1-2 minutes per side to avoid overcooking. The crispiness will be slightly different, but the tangy sauce still shines.
Why does my pork turn out greasy instead of crispy?
Greasy pork usually means the oil wasn't hot enough (325°F or lower) or the batches were too crowded. Keep oil at 350°F and fry in small batches—no more than 1/3 of the pan at a time. Also, pat the pork dry before coating to prevent excess moisture from steaming instead of frying.
How do I make the sauce thicker or thinner?
For a thicker sauce, simmer it 2-3 minutes longer or add 1 tsp cornstarch mixed with water. To thin it, add 1-2 tbsp water or pineapple juice while heating. The sauce should coat the back of a spoon but still be pourable—not gluey. Taste as you go to adjust sweetness or tanginess too!
Can I make this ahead of time?
Yes! Cook the pork and sauce separately, then refrigerate in airtight containers for 3-4 days. Reheat the pork in a skillet with a splash of water, then toss with warmed sauce. The sauce actually tastes better the next day as flavors meld. For freezing, store components separately for 3 months—thaw overnight in the fridge.
What's the best way to serve it?
Traditionally over steamed jasmine rice or egg noodles to soak up the sauce. For extra flair, add a side of steamed bok choy or pickled vegetables. Garnish with sesame seeds or green onions for freshness. The crispy pork also works as a filling for lettuce wraps or over cucumber slices for a low-carb option.