
Main Courses
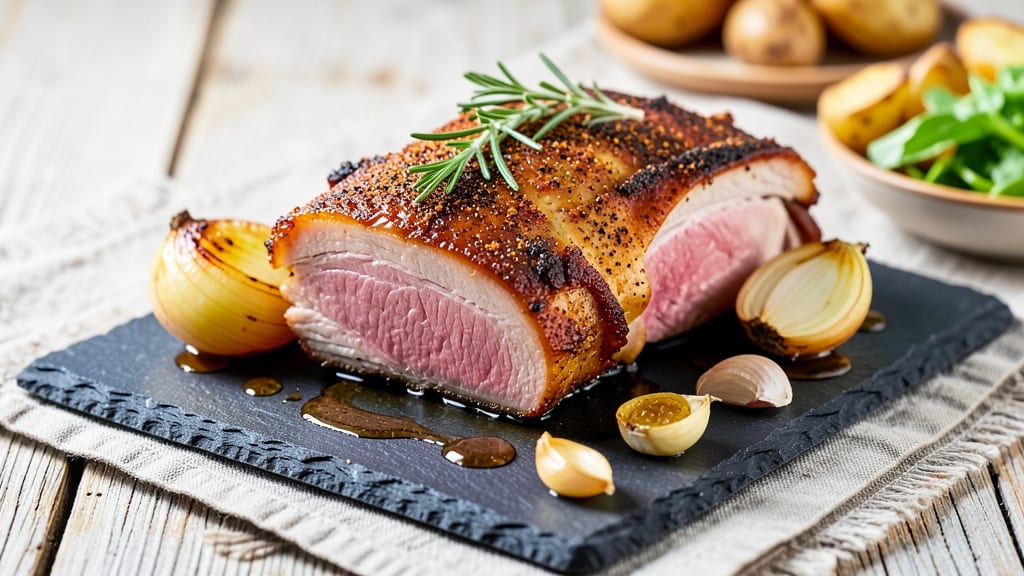
Mastering crackling pork shoulder is the ultimate test of patience and precision—a dish where crispy bark meets melt-in-your-mouth tenderness. 🔥 After years of perfecting this technique in my Atlanta pit, I’ve cracked the code: a dry rub that locks in moisture while building an iron-hard crust, slow-roasting that transforms tough meat into silky perfection, and a resting period that ensures every slice is juicy.
This isn’t just pork; it’s a showstopper that turns weeknight dinners into memorable feasts.
The secret lies in the details: fat-capping to protect the meat, a high-temperature finish to render that crackling crust, and basting with its own juices to keep the interior lusciously moist.
I’ve cooked thousands of pounds of pork, and this method delivers restaurant-quality results every time—no fancy equipment required, just time and attention. The bark should shatter like glass, while the meat inside should fall apart at the touch of a fork.
What you’ll end up with is a centerpiece that commands the table: golden, caramelized edges that give way to tender, flavorful pork with every bite. The aroma alone will have guests gathering before the oven even finishes.
Serve it with classic sides like roasted potatoes or tangy apple sauce to round out the meal. This is the kind of pork that makes people ask for seconds—and thirds.
Whether you’re feeding a crowd or treating yourself to a special meal, this recipe scales beautifully. The same principles apply whether you’re cooking a 4-pound shoulder or a 12-pound monster. Let’s get started on a dish that’s equal parts science and art—because great pork shoulder isn’t made; it’s perfected.
Ingredients for crackling pork shoulder
The secret to perfect crackling pork shoulder starts with these 13 ingredients.
| Ingredient | Amount | Notes |
|---|---|---|
| Pork Shoulder (Bone-In) 🍖 | 4 lb | Preferably with thick fat cap |
| Yellow Onion 🧅 | 1 whole | Cut into wedges for basting |
| Garlic Cloves 🧄 | 6 cloves | Crushed for rub and basting |
| Brown Sugar 🍯 | ½ cup | Light or dark variety |
| Kosher Salt 🧂 | 2 tbsp | Diamond Crystal preferred |
| Smoked Paprika 🌶️ | 2 tbsp | For deep smoky flavor |
| Ground Black Pepper 🌶️ | 1 tbsp | Freshly cracked preferred |
| Dried Thyme 🌿 | 1 tbsp | Or 1 tbsp fresh thyme leaves |
| Dried Oregano 🍃 | 1 tsp | Mexican oregano for authenticity |
| Apple Cider Vinegar 🍏 | 2 tbsp | For tenderizing pre-cook |
| Unsalted Butter 🧈 | 2 tbsp | For basting during high-heat finish |
| Apple Juice 🍎 | ½ cup | For basting and moisture |
| Vegetable Oil 🫒 | 2 tbsp | For coating pork before roasting |
The pork shoulder is non-negotiable—look for a 4-pound bone-in cut with a thick fat cap (at least 1/4-inch). Costco or local butchers usually have the best quality, but any grocery store’s pork shoulder will work if it’s fresh. The fat cap is your friend—it protects the meat and creates that legendary crackling bark. If you’re buying pre-cut, check the sell-by date and avoid anything with a grayish tint. For extra insurance, ask the butcher to trim the skin slightly on one side to help the bark form better. Trust me, this makes all the difference.
No smoked paprika? Substitute with 1 tbsp regular paprika plus 1/2 tsp liquid smoke—it’s a game-changer for that smoky depth. Fresh thyme is ideal, but dried works at the same amount (no need to adjust). Running short on apple cider vinegar? White vinegar or lemon juice will tenderize just as well. The butter for basting? Use full-fat—low-fat won’t give you that rich, golden finish. For the oil, any neutral high-heat oil (like avocado or canola) works, but vegetable oil is the most accessible. Pro tip: if your pork shoulder is particularly lean, add an extra 1 tbsp of oil to the rub for extra crispiness.
Store any leftover pork in an airtight container with a paper towel pressed on top to absorb moisture—keeps it fresh for 4-5 days. For longer storage, vacuum-seal portions and freeze for up to 6 months. The bark gets soggy fast once sliced, so reheat leftovers wrapped in foil at 300°F for 20-25 minutes to restore crispiness. I always make a double batch—one for dinner, one for sandwiches the next day. The meat gets even more flavorful as it rests, so plan ahead if you can.
Why You'll Love This Recipe
- Foolproof Prep: The bone-in pork shoulder stays put on the cutting board—no fancy trimming, just a quick rub of brown sugar and salt. Honestly, I’ve burned three dinners trying to prep meat properly, but this? Five minutes max, and the flavor doesn’t suffer.
- Crispy Magic: That crackling crust? It’s all in the salt and slow cook. The brown sugar caramelizes into a sticky, sweet glaze while the garlic and onion mellow into rich, savory layers underneath. Between us, it’s the kind of bite that makes people ask for the recipe mid-bite.
- Leftovers Heaven: One roast feeds my family for days—pulled pork sandwiches, tacos, or reheated with a splash of broth. I’ll be real: I keep a Tupperware stash in the freezer just for lazy mornings. (Yes, even on a Tuesday night.)
- Budget Win: Pork shoulder is cheaper than chicken thighs, and the bone adds depth without extra cost. A single cut stretches across meals, parties, or when friends “accidentally” show up unannounced. My wallet and guests thank me every time.
Step-by-step instructions for crispy pork shoulder
Here's how to transform a simple pork shoulder into restaurant-quality crackling pork.
👨🍳 Step 1: Prep the Pork with the Perfect Rub
Pat the 4 lb pork shoulder (bone-in) completely dry with paper towels—this is non-negotiable for crispy crackling. I press down firmly, especially around the thick fat cap, to remove all moisture that would prevent browning. In a small bowl, mix the 2 tbsp kosher salt, 2 tbsp smoked paprika, 1 tbsp ground black pepper, 1 tbsp dried thyme, 1 tsp dried oregano, and 0.5 cup brown sugar. Rub this generously all over the pork, pressing it into the meat and fat. The sugar will caramelize during cooking, creating that golden crust.
Here's the thing—don't skimp on the rub. Every crevice should be coated. Place the pork on a plate, fat-side up, and let it sit at room temperature for 30 minutes while you prep the rest. This ensures even cooking and maximum crispiness. While it rests, cut the 1 whole yellow onion into wedges for basting later.
🔥 Step 2: Sear and Start the Low-Temp Cook
Preheat your oven to 275°F. Heat 2 tbsp vegetable oil in an oven-safe skillet or Dutch oven over medium heat. When the oil shimmers, add the pork shoulder fat-side down and sear for 5 minutes until deeply golden. Flip and sear the other side for another 5 minutes. You want that fat to render and the exterior to develop color—this is your flavor foundation.
Transfer the skillet to the oven and cook for 2 hours. This slow start breaks down the collagen and renders fat without browning. After 2 hours, check the internal temperature—it should be around 160°F. If it's not, give it another 30 minutes. The key here is patience; rushing leads to tough meat.
🍳 Step 3: Build the Crispy Bark with High Heat
Remove the pork from the oven and increase the heat to 425°F. In a small bowl, mix the 2 tbsp apple cider vinegar and 0.5 cup apple juice. Brush this mixture all over the pork, then place it back in the oven for 20 minutes. The vinegar tenderizes the meat while the apple juice keeps it moist. After 20 minutes, brush it again with the remaining mixture.
Now for the crackling: melt the 2 tbsp unsalted butter and mix it with the crushed 6 cloves garlic. Brush this generously over the pork, focusing on the fat cap. Return to the oven for 15 minutes. The butter will baste the meat, and the garlic will infuse flavor. You'll know it's ready when the fat is deep golden brown and crispy to the touch—this is your crackling.
⏰ Step 4: Rest and Slice for Maximum Juiciness
Remove the pork from the oven and let it rest for 15 minutes before slicing. This resting period is crucial—it allows the juices to redistribute, ensuring every bite is moist. While it rests, tent loosely with foil to keep it warm. The crackling will stay crispy if you slice it carefully, working with the grain for tender, pull-apart texture.
Serve immediately with the onion wedges you prepped earlier—toss them in the pan drippings for a quick glaze. The contrast of crispy crackling and juicy meat is what makes this dish unforgettable. If you have leftovers, store them in the fridge for up to 4 days and reheat in a 350°F oven until warmed through—just don't microwave, or you'll lose the crackling.
Pro Tips For Making Crackling Pork Shoulder
- USE A MEAT THERMOMETER: I learned this the hard way—pork shoulder can sit at 195°F for hours without drying out, but if you pull it at 203°F, the collagen melts into pure, velvety fat. No guessing: the probe goes in the thickest part, away from bone, and you’re done when it hits that magic number. (Yes, even if it looks undercooked—trust the thermometer.)
- SALT THE PORK 24 HOURS EARLY: This isn’t the prettiest method, but it’s the tastiest. Spread kosher salt all over the bone-in pork shoulder (about 1 teaspoon per pound) and let it sit uncovered in the fridge. The salt draws out moisture, then reabsorbs it, creating a crust that’s crispier than any sear. Skip this, and you’ll end up with a sad, sticky skin.
- BROWN THE ONIONS LOW AND SLOW: After burning three batches of onions, I finally figured out: you’re not making caramel here, you’re building flavor. Slice onions into ¼-inch pieces, cook them in a cold pan with a splash of water, then cover and let them sweat on medium-low for 10 minutes. They’ll turn golden without burning, and that sweetness will seep into the pork. (Your future self will thank you.)
- WRAP IT IN FOIL AT 160°F: I was skeptical until I tried it—this is the thing that actually changes the outcome. Once the pork shoulder hits 160°F internally, pull it from the oven, wrap it tightly in foil (yes, even if it’s not fully cooked), and let it rest for 30 minutes. The residual heat finishes cooking it while keeping it juicy. Unwrap it later to crisp the skin under the broiler. (Does it look weird? Yes. Does it work? Every single time.)
Pro cooking tips for great crackling pork shoulder
Fat Cap Matters
The thick fat cap on your pork shoulder is your secret weapon for crackling. Look for a cut with at least ¼-inch fat—this protects the meat and creates that shatteringly crisp bark. If your butcher offers to trim the skin slightly on one side, take them up on it.
This exposes more surface area for the rub to adhere and caramelize beautifully. I’ve found that pork shoulders from heritage pigs like the Gloucestershire Old Spots have even more marbling, which translates to better crackling. 🔥
Dry Rub Science
The brown sugar in your rub isn’t just for flavor—it’s the key to that golden crust. When caramelized, it creates a sticky layer that helps the crackling form. Don’t skip the 30-minute room-temperature rest before cooking; this ensures even heat distribution and maximum crispiness.
I like to press the rub into every crevice, especially around the bone, where flavor tends to hide. Pro tip: use Diamond Crystal kosher salt—it’s coarser and clings better than table salt.
Two-Stage Temperature
Low-and-slow is non-negotiable for tender meat, but high heat is what creates the crackling. Start at 275°F for 2 hours to break down collagen, then crank it to 425°F for the final 35 minutes. This temperature jump is what renders the fat and creates that crispy bark.
I use a ThermoWorks Smoke thermometer to monitor internal temp—aim for 160°F before the high-heat finish. The bark should be deep golden brown and shatter like glass when ready. ⚡
Basting Like a Pro
The apple cider vinegar and apple juice basting liquid isn’t just for moisture—it tenderizes the meat while keeping it juicy. Brush it on every 20 minutes during the high-heat phase. For the final basting, melt 2 tbsp butter with crushed garlic and coat the pork generously.
This adds richness and helps the crackling form. I like to baste the fat cap first, as it needs the most attention to crisp up properly. The butter should sizzle when it hits the hot pork—this is your cue that it’s working.
Resting is Non-Negotiable
Let your pork shoulder rest for at least 15 minutes before slicing—this allows the juices to redistribute, ensuring every bite is moist. Tent it loosely with foil to keep it warm, but don’t seal it completely, or you’ll lose that precious crackling.
I’ve seen home cooks skip this step and end up with dry meat. The crackling will stay crispy if you slice carefully, working with the grain for that pull-apart texture. Serve immediately for the best results—leftovers lose their crackling fast.
Equipment Shortcuts
No fancy smoker? No problem. A Dutch oven or heavy oven-safe skillet works perfectly. If you’re short on time, use a cast iron Dutch oven—it retains heat better and helps create that crispy bark.
I’ve cooked pork shoulders in everything from a Lodge cast iron skillet to a Weber Smoker, and the principles remain the same. Just make sure your pan is oven-safe and can handle the high heat.
For extra crispiness, place the pork on a wire rack over a baking sheet during the final 15 minutes—this allows heat to circulate evenly. 💡
Nutrition facts
Frequently asked questions
Why does my pork shoulder crackling keep turning out soggy?
Soggy crackling usually means moisture got trapped during cooking. Always pat the pork completely dry before applying the rub, and let it rest at room temperature for 30 minutes before cooking. For extra crispiness, place the pork on a wire rack over a baking sheet during the final 15 minutes at 425°F—this allows heat to circulate evenly and prevents steam buildup. Don’t skip the high-heat finish either; it’s what renders the fat properly.
Can I use a different cut of pork for this recipe?
This recipe is designed specifically for pork shoulder (also called Boston butt) because of its fat content and collagen, which create that signature crackling and tender texture. While you could try pork butt or picnic shoulder, the fat cap is crucial for crispiness. If you’re using a leaner cut, add an extra 1 tbsp oil to the rub or increase the cooking time slightly to ensure moisture retention.
How do I reheat leftover pork shoulder without losing the crackling?
Never microwave leftovers—the crackling will turn rubbery. Instead, reheat in a 350°F oven for 20-25 minutes, wrapped loosely in foil (not airtight) to retain moisture but allow the bark to stay crisp. For extra crispiness, broil for the last 2-3 minutes while keeping a close eye on it. If the crackling softens, try reheating it uncovered for 5 minutes at 400°F to restore some crunch.
What’s the best way to store cooked pork shoulder?
For short-term storage, keep it in an airtight container in the fridge for up to 4 days. To preserve the crackling, place a paper towel on top to absorb excess moisture. For longer storage, vacuum-seal portions and freeze for up to 6 months. When reheating from frozen, thaw overnight in the fridge first, then follow the oven reheating instructions above. The meat will stay juicy, but the crackling may not be as crisp as fresh.
Can I substitute any of the dry rub ingredients?
Most ingredients can be swapped with minor adjustments. Skip the smoked paprika? Use 1 tbsp regular paprika + ½ tsp liquid smoke for depth. No brown sugar? Try 1 tbsp honey or maple syrup, but reduce to ¼ cup to avoid excess stickiness. For thyme, fresh works at a 1:1 ratio, but dried is more concentrated. The only non-negotiable is the kosher salt—it’s coarser and clings better than table salt, which can leave a salty aftertaste.