
Main Courses
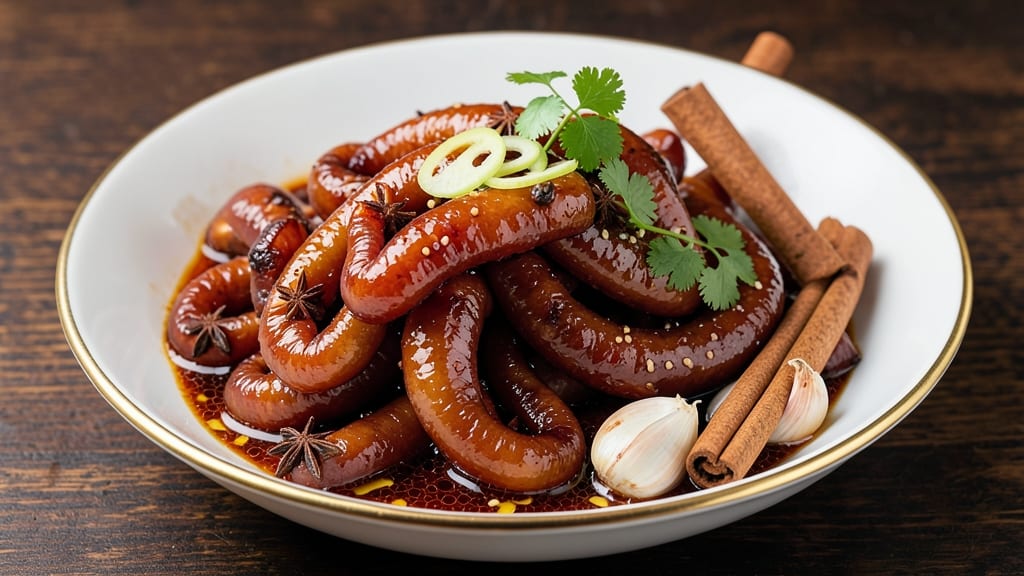
This Chinese braised pork intestine recipe transforms humble ingredients into a dish that feels like a homecoming. 🔥 The secret lies in slow-cooking the intestines until they become silky and tender, infused with the deep, savory flavors of soy sauce, star anise, and ginger.
I first learned this technique from my mentor in Charleston, where pork braising is an art form—patient, precise, and deeply rewarding.
The process begins with thorough cleaning and marinating to remove any impurities, then simmering in a rich broth until the meat practically melts in your mouth. The aromatic spices—like cinnamon and cloves—build layers of complexity, while the soy glaze adds a glossy finish that makes every bite irresistible.
This isn’t just a recipe; it’s a celebration of texture and tradition.
By the time you’re done, you’ll have a dish that’s tender yet robust, with a sauce so flavorful it clings to every strand. The result is restaurant-quality comfort food, perfect for sharing or savoring alone.
Whether you’re feeding a crowd or treating yourself, this recipe delivers the kind of satisfaction that comes from slow, careful cooking.
Pair it with steamed jasmine rice and quick-pickled vegetables to round out the meal. The contrast of textures and temperatures makes each bite even more enjoyable. Let’s get started—your taste buds will thank you.
Ingredients for chinese braised pork intestine
Pork intestines, aromatic spices, and soy sauce create a dish that feels like a homecoming.
| Ingredient | Amount | Notes |
|---|---|---|
| Pork Intestines (Chitterlings) 🥩 | 1 ½ lb | Fresh or frozen, thoroughly cleaned |
| Soy Sauce 🍶 | ½ cup | Light or dark, for depth |
| Star Anise 🌿 | 2 whole | For aromatic complexity |
| Ginger Root 🧅 | 2 tbsp | Freshly grated, zesty kick |
| Garlic Cloves 🧄 | 6 cloves | Minced, aromatic base |
| Cinnamon Sticks 🌿 | 2 whole | For warm spice notes |
| Cloves 🌶️ | 4 whole | Pounded lightly for depth |
| Brown Sugar 🍯 | ¼ cup | Balances soy sauce sweetness |
| Dried Red Chilies 🌶️ | 2 pieces | Optional, for subtle heat |
| Green Onions 🧅 | 4 whole | Sliced, for garnish |
| Sesame Oil 🫒 | 1 tbsp | For finishing aroma |
| Vegetable Oil 🫒 | 2 tbsp | For initial searing |
| Water 💧 | 2 cups | For simmering broth |
| Salt 🧂 | 1 tsp | Adjust to taste |
Pork intestines are the star here—fresh or frozen works, but they MUST be thoroughly cleaned. Most Asian markets carry them pre-cleaned, which saves time. If using frozen, thaw overnight in the fridge—never at room temperature. Look for intestines with a vibrant pink color and minimal fat; the fresher, the better. In Charleston, I’ve found the best quality at H Mart or Piggly Wiggly’s Asian section. The spices—star anise, cinnamon, and cloves—are non-negotiable for that deep, complex flavor. Penzeys Spices sells them whole, which is ideal for this recipe.
No star anise? Anise seeds work in a pinch, but the flavor won’t be as layered. Fresh ginger is a must—dried loses its zing. If you’re short on time, Trader Joe’s pre-grated ginger is a lifesaver, though fresh is always better. The soy sauce can be light or dark, but Kikkoman or Lee Kum Kee are reliable choices. For the chilies, dried Thai chilies add the most heat, but any dried red chili will do. The brown sugar helps balance the soy’s saltiness, so don’t skip it—trust me, the sauce will thank you.
This dish tastes even better the next day as the flavors meld. Store leftovers in an airtight container in the fridge for up to 5 days. The sauce thickens as it cools, so a splash of water can loosen it when reheating. For freezing, portion into single-serving containers—it reheats beautifully and keeps for 3 months. Garnish with green onions right before serving to keep it fresh and vibrant. Pair with steamed jasmine rice for the full experience.
Why You'll Love This Recipe
- No Fuss, Big Payoff: I swear by this recipe because it’s actually low-effort—just a quick soak, a simmer, and those star anise pods do all the work while you sip tea. The intestines turn tender without falling apart, and the garlic-ginger base builds flavor faster than takeout.
- Umami Bomb: That soy sauce caramelizes into something deep—like a slow-cooked secret. Between us, the star anise adds a warm, licorice-kissed depth that makes it taste like a restaurant dish, not a weeknight hack. (Yes, even my picky husband finishes his plate.)
- Leftovers That Shine: This dish begs to be reheated—better the second day, honestly. I freeze portions for lazy nights, and it’s still rich and satisfying. Plus, it stretches across multiple meals without tasting stale.
- Budget Hero: Pork intestines are cheap, and a pound lasts forever. With just a handful of pantry staples (soy sauce, spices), you’re feeding a crowd for less than takeout. Honestly, it’s my go-to for potlucks or when friends drop by unannounced.
Step-by-step instructions for braised pork intestines
Transform tough chitterlings into melt-in-your-mouth tenderness with this simple one-pot method.
🍳 Step 1: Prepare and Parboil the Chitterlings
Start by rinsing the 1.5 lb pork intestines (chitterlings) thoroughly under cold water to remove any impurities. I like to soak them in cold water for 15 minutes, changing the water a couple of times to ensure they're completely clean. After rinsing, bring a large pot of water to a boil and add the chitterlings. Boil them for 10 minutes to remove any remaining impurities and partially cook them.
Drain the chitterlings and rinse them again under cold water. This step is crucial—it removes any blood or off-flavors that could make the final dish bitter. Once drained, you'll notice the chitterlings will shrink slightly as they cook down. Set them aside for the next step.
👨🍳 Step 2: Build the Aromatic Base
In a large Dutch oven or heavy pot, heat the 2 tbsp vegetable oil over medium heat. Add the 6 minced garlic cloves and 2 tbsp freshly grated ginger root, cooking for 1-2 minutes until fragrant. Here's the thing—don't let the garlic burn, or you'll get bitter flavors instead of that sweet, aromatic punch we're after.
Add the 2 whole star anise, 2 whole cinnamon sticks, 4 whole cloves, and 2 pieces dried red chilies (if using). Stir for 30 seconds to toast the spices gently. This step unlocks their full flavor potential. You'll smell that warm, spicy aroma filling your kitchen—that's when you know you're on the right track.
🥘 Step 3: Braise with Soy and Sugar
Increase heat to medium-high and add the parboiled chitterlings to the pot. Pour in the 0.5 cup soy sauce and 0.25 cup brown sugar, stirring to coat the chitterlings evenly. Add the 2 cups water and bring everything to a gentle boil. Once boiling, reduce heat to low and cover the pot with a lid.
Let the chitterlings simmer for 1 hour, stirring occasionally. You want to maintain a gentle simmer—not a rolling boil—so the chitterlings cook through without toughening. After about 45 minutes, you'll notice the liquid reduces and the chitterlings become more tender. This is where the magic happens—the soy sauce and sugar work together to create that glossy, silky glaze.
🔥 Step 4: Finish with Sesame Oil and Rest
After 1 hour, remove the lid and increase heat to medium-high to reduce the sauce slightly. Simmer uncovered for 5-10 minutes until the sauce thickens to your desired consistency—it should coat the back of a spoon but still be saucy. Stir in the 1 tbsp sesame oil and 1 tsp salt, tossing the chitterlings to coat them evenly. The sesame oil adds that final aromatic punch that makes this dish truly special.
Turn off the heat and let the chitterlings rest in the pot for 10 minutes, covered. This resting period allows the flavors to meld and the chitterlings to absorb all that delicious braising liquid. While they rest, slice the 4 whole green onions and set them aside for garnish.
🍽️ Step 5: Serve with Confidence
Transfer the braised chitterlings to a serving platter, spooning the sauce over the top. Garnish with sliced green onions for freshness and color. The chitterlings should be fork-tender with a glossy, silky exterior—each bite should melt in your mouth. Serve immediately with steamed rice to soak up that rich, savory sauce.
This dish tastes even better the next day as the flavors deepen, so don't hesitate to make extra. The key to success is patience—letting the chitterlings simmer gently until they're melt-in-your-mouth tender. Trust the process, and you'll have a restaurant-quality dish right in your own kitchen.
Pro Tips For Making Chinese Braised Pork Intestine
- BLEACH THE INTESTINES TWICE: I learned this the hard way—skipping the second bleach soak leaves a faint off-flavor that lingers even after hours of braising. Use 1 tablespoon baking soda per gallon of water for the second soak (10-15 minutes), then rinse thoroughly under cold water. The extra effort removes the last traces of bile that ruin the clean, savory finish.
- SIMMER LOW AND SLOW: This isn’t the time to rush. After the initial sear, drop the heat to medium-low and let the pot barely bubble—think tiny, lazy ripples, not a rolling boil. I used to crank it up for speed, but the intestines turned rubbery and the stock split. 2.5–3 hours minimum at this stage guarantees tender, melt-in-your-mouth texture.
- CRUSH STAR ANISE HARD: Whole star anise just sits there like a decorative rock. Smash it with the side of your knife or a mortar and pestle before adding it to the pot—this releases the aromatic oils that actually flavor the dish. I was skeptical until I tried it; the difference in depth is night and day, especially when paired with the pork’s richness.
- ADD GINGER AND GARLIC LATE: Tossing them in at the start burns their delicate flavors into oblivion. Wait until the last 30 minutes of cooking, when the intestines are nearly tender, to add 4–5 thin slices of ginger and 6–8 smashed garlic cloves. This keeps their bright, fresh notes intact instead of letting them turn bitter and charred. (Yes, even if you’re impatient like me.)
Make-ahead tips for chinese braised pork intestine
Prep Ahead Strategy
Start the cleaning and parboiling process 24 hours in advance—this is the most time-consuming step. I like to prep the chitterlings the night before and store them in the fridge in their parboiled state.
This saves 45 minutes of active prep time on cooking day. Just rinse them again before braising to remove any surface moisture. 💫
Spice Toasting Shortcut
Toast your spices—star anise, cinnamon sticks, and cloves—in a dry skillet for 1-2 minutes the night before. Store them in an airtight container until ready to use. This step can be done while you're prepping other dishes or even while watching TV.
The aroma alone will make your kitchen smell like a Chinese restaurant. 🌿
Sauce Prep in Advance
Mix the soy sauce, brown sugar, and water in a bowl the night before and refrigerate. This allows the sugar to dissolve completely and the flavors to start melding.
When you're ready to cook, simply heat the mixture in the pot with the chitterlings. This ensures a smoother, more cohesive sauce without any graininess. 🍶
Freezer-Friendly Portions
Divide the fully cooked chitterlings into single-serving portions and freeze them in airtight containers. They reheat beautifully—just thaw overnight in the fridge, then warm in a skillet with a splash of water over medium heat for 5-7 minutes.
This is perfect for meal prep or when you want to serve this dish at a moment's notice. ❄️
Garnish Prep
Slice the green onions and store them in a small airtight container with a paper towel to absorb moisture. Keep them refrigerated until ready to use.
Freshly sliced green onions add a pop of color and brightness to the dish, so don't skip this final garnish—it makes all the difference. 🧅
Make-Ahead Timeline
Here’s my foolproof timeline: Clean and parboil the chitterlings 1 day ahead, toast the spices 1 night ahead, and prep the sauce the night before cooking day.
On the day of cooking, you’ll only need to focus on the braising and finishing steps—about 1.5 hours of active time. This makes it perfect for busy weeknights or special gatherings. 📅
Nutrition facts
Frequently asked questions
Why do I need to parboil the pork intestines first?
Parboiling removes impurities, blood, and off-flavors that can make the final dish bitter. The 10-minute boil also partially cooks the intestines, reducing cooking time later. Skipping this step risks a tough, gamey texture—trust the process, it’s worth it!
Can I substitute pork intestines with other offal?
While pork intestines are traditional, you can try pork belly or trotter in a pinch—but texture will differ. For a similar silky result, use 1.5 lb pork belly, cut into strips, and increase braising time to 1.5 hours. The spices and soy glaze still work beautifully!
What if my braised intestines are still tough?
Toughness usually means undercooking. Extend simmering to 90 minutes on low heat—cover with extra water if needed. For extra tenderness, add 1 tbsp baking soda to the parboiling water (rinsed off later). This breaks down collagen naturally.
How do I store leftovers without drying them out?
Store in an airtight container with 1 tsp soy sauce per serving to keep them moist. Reheat gently in the sauce over low heat—never microwave dry. Leftovers actually improve as flavors meld, so they’re perfect for lunch the next day!
Are there vegetarian-friendly substitutions?
For a plant-based version, use king oyster mushrooms or shitake mushrooms—they absorb flavors well. Replace pork fat with vegetable oil and add 1 tsp miso paste for umami depth. Texture won’t be identical, but it’s a great alternative!