
Main Courses
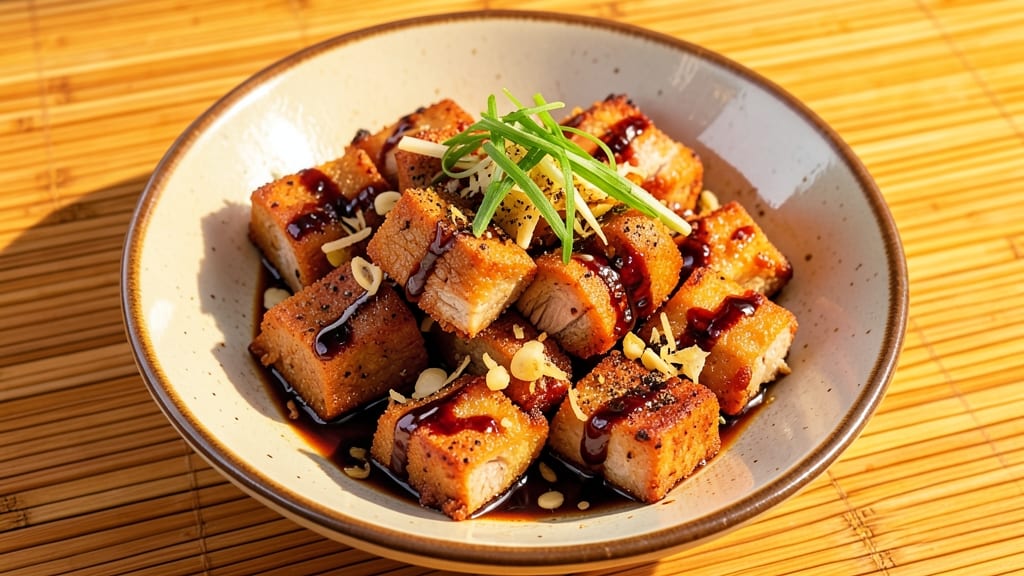
This Chinese fried pork recipe delivers the perfect balance of crispy, five-spice crunch and silky, tender meat—a technique I perfected after years of studying Cantonese cooking methods. The secret lies in the marinade and double-frying process, which creates that signature contrast between exterior and interior.
I’ve adapted this classic dish to work with modern kitchens while keeping the soul of traditional Chinese cuisine intact.
What sets this recipe apart is the five-spice blend—star anise, cinnamon, cloves, fennel, and Szechuan peppercorn—that infuses the pork with aromatic depth. The marinade tenderizes the meat while the double-frying ensures a golden, crackling crust without drying it out.
Even if you’re new to deep-frying, this method is foolproof with the right temperature control.
By the time you’re done, you’ll have juicy, flavorful pork that’s crispy on the outside and melt-in-your-mouth tender inside, ready to be sliced and served over steamed rice or in lettuce wraps.
The aroma alone will have everyone at the table asking for seconds. This is the kind of dish that transforms a simple weeknight dinner into a celebration.
Whether you’re making it for a family gathering or a solo treat, this recipe scales beautifully and delivers restaurant-quality results. The technique is straightforward, but the flavor payoff is extraordinary. Let’s get cooking!
Ingredients for chinese fried pork
Pork, spices, and double-frying magic—here’s what you’ll need for restaurant-style fried pork.
| Ingredient | Amount | Notes |
|---|---|---|
| Pork Shoulder 🥩 | 1 ½ lb | Cut into 1-inch cubes, boneless |
| Soy Sauce 🍶 | ½ cup | High-sodium, like Kikkoman |
| Shaoxing Wine 🍷 | 2 tbsp | Or dry sherry in a pinch |
| Brown Sugar 🍯 | 2 tbsp | Light or dark, packed |
| Garlic Cloves 🧄 | 6 cloves | Minced, aromatic |
| Fresh Ginger 🌿 | 1 tbsp | Grated, peeled |
| Five-Spice Powder 🌶️ | 1 tbsp | Homemade or store-bought |
| Cornstarch 🌾 | ¼ cup | For crispy coating |
| Vegetable Oil 🫒 | 3 cups | High smoke point, like peanut |
| Green Onions 🧅 | 4 whole | Sliced, for garnish |
| Sesame Seeds 🌰 | 1 tbsp | Toasted, for crunch |
| Salt 🧂 | 1 tsp | Kosher or sea salt |
| Black Pepper 🌶️ | ½ tsp | Freshly ground |
| White Pepper 🌶️ | ½ tsp | For subtle heat |
The pork shoulder is non-negotiable here—it’s got the right fat-to-meat ratio for that melt-in-your-mouth texture. Ask your butcher to cut it into 1-inch cubes if they don’t already, or grab pre-cubed from the freezer section at Trader Joe’s or Costco. Look for pieces with good marbling; that’s what keeps the meat juicy during frying. Shaoxing wine is the gold standard, but dry sherry or even mirin will work if you can’t find it. The five-spice powder? Penzeys or Spicewalla carry the best blends—just make sure it’s got all five spices listed in the intro. Fresh ginger and garlic? Buy organic if possible—the flavor difference is noticeable.
No Shaoxing wine? Dry sherry or mirin works in a pinch, but cut the amount to 1 tbsp. The five-spice blend missing a spice? Substitute with equal parts of the ones you have, but cloves and fennel are the most critical. For the cornstarch coating, arrowroot powder works too, though it’s trickier to find. The oil is where things get serious—peanut or vegetable oil is ideal, but avocado oil is a great backup. And if you’re short on sesame seeds, toasted peanuts or crushed potato chips can add crunch in a bind. Just don’t skip the double-frying step—that’s what gives you the crispy crust and tender interior.
Marinate the pork for at least 4 hours, but overnight is even better. The flavors meld beautifully, and the meat stays juicy. Store the marinade in a sealed container in the fridge for up to 3 days. Once fried, the pork keeps well in the fridge for 3-4 days, though it’s best served fresh. For leftovers, reheat in a skillet with a splash of water to keep it crispy. Freezes for 2 months—just thaw in the fridge overnight before reheating. And if you’re making this for a crowd, double the batch. Trust me, it disappears fast.
Why You'll Love This Recipe
- One-Pan Magic: I swear by this recipe when I’m too tired to wash dishes. The pork shoulder gets marinated in soy sauce, Shaoxing wine, and brown sugar—all in one bowl, then straight to the pan. No extra bowls, no fuss, just crispy, sticky goodness with minimal cleanup.
- Umami Bomb: That first bite? Chef’s kiss. The garlic cloves sizzle into the pork, while the soy and brown sugar caramelize into a glossy, addictive glaze. It’s sweet, salty, and savory all at once—like a hug in your mouth.
- Lunchbox Hero: Between us, this is my go-to for meal prep. The leftovers reheat beautifully—crispy edges stay intact, and the sauce clings to every bite. Pack it in rice bowls for work or toss it into noodles when you’re craving something hearty.
- Budget Stretch: Pork shoulder is cheap, and a single batch feeds my family for days. The Shaoxing wine (or even a splash of dry sherry) elevates it without breaking the bank. Honestly, it’s the kind of dish that makes grocery day feel like a win.
Step-by-step instructions for Chinese fried pork
Here's how to get that perfect balance of crispy exterior and tender interior every time.
Marinate the Pork for Maximum Flavor
In a large bowl, combine the 1.5 lb pork shoulder cut into 1-inch cubes, the 0.5 cup soy sauce, 2 tbsp Shaoxing wine, 2 tbsp brown sugar, 1 tbsp five-spice powder, 6 minced garlic cloves, and 1 tbsp grated fresh ginger. Mix thoroughly until every piece of pork is well coated in the marinade.
Let the pork marinate at room temperature for 30 minutes—this ensures even flavor penetration. I like to press the marinade into the meat with my hands so it really soaks in. The five-spice powder is what gives this dish its signature aromatic depth, so don't skip this step. The pork should smell rich and complex by the time you're ready to cook.
Create the Crispy Cornstarch Coating
In a separate shallow bowl, combine the 0.25 cup cornstarch, 1 tsp salt, 0.5 tsp black pepper, and 0.5 tsp white pepper. This coating is what creates that signature crunch—don't use flour, as it won't give you the same texture. The white pepper adds a subtle warmth that pairs perfectly with the other spices.
Remove the pork from the marinade (reserve the marinade for later) and pat it completely dry with paper towels. This step is crucial—any moisture on the pork will prevent the cornstarch from sticking properly and creating that perfect crispy crust. Toss the pork cubes in the cornstarch mixture until they're evenly coated and the crumbs adhere well to the surface.
Deep-Fry to Golden Perfection
Heat 3 cups vegetable oil in a deep skillet or Dutch oven to 350°F—use a thermometer to ensure accuracy. The oil should be hot enough that when you test it with a small piece of pork, it sizzles vigorously and floats to the surface. Add the cornstarch-coated pork in batches (don't overcrowd the pan) and fry for 3-4 minutes until golden brown and crispy.
Here's the thing—you want the pork to cook quickly and evenly. If you see the oil smoking excessively, reduce the heat slightly. Once the pork is golden and crispy, remove it with a slotted spoon and drain on a wire rack or paper towels. The rack allows air to circulate, preventing sogginess. Keep the oil hot for the next batch.
Finish with the Signature Sauce
Return the fried pork to the skillet and pour in the reserved marinade. Increase the heat to medium-high and let it simmer for 2-3 minutes until the sauce thickens slightly and coats the pork. The pork should absorb the flavors while staying crispy—this is where the magic happens.
Garnish with 4 sliced green onions and 1 tbsp toasted sesame seeds just before serving. The sesame seeds add a nutty crunch that contrasts beautifully with the crispy pork. Serve immediately while the pork is still hot and the coating is at its crispest. The contrast of textures—crunchy exterior, silky interior—is what makes this dish so special.
Pro Tips For Making Chinese Fried Pork
- VELVEET THE PORK FIRST: Skip the raw pork shoulder straight into the pan—it’ll steam instead of sear. After slicing thin (about ¼-inch), pat it dry with paper towels, then toss in a mix of 1 tablespoon soy sauce, 1 teaspoon Shaoxing wine, and a pinch of sugar. Let it sit 10 minutes—this jumpstarts flavor and keeps it from shrinking like a sad, rubbery mess.
- START HOT, THEN LOW: The first 30 seconds in a screaming-hot wok or skillet are non-negotiable—you’re chasing that Maillard reaction, not a sad, greasy stir-fry. Once the pork hits the pan, push it to one side, add 2 tablespoons oil, and let it shimmer before tossing. After 2 minutes, drop the heat to medium-low. Too much heat now, and your garlic burns before the pork finishes.
- MINCE THAT GARLIC FINE: Whole cloves? Forget it. You’ll end up with garlic chunks that taste like they’re playing hide-and-seek. Pulse 6-8 cloves in a food processor until it’s a paste—no need to go full guacamole, just fine enough to dissolve into the sauce. Add it to the pan after the pork starts to brown, so it infuses without turning bitter. (Yes, even if you’re impatient like me.)
- SAVE THE WINE FOR LAST: Pouring Shaoxing wine too early means it evaporates before it can do its magic. Wait until the pork’s halfway cooked and the garlic’s fragrant, then splash in 1 tablespoon. Let it sizzle for 10 seconds before adding the soy sauce and sugar—this locks in depth of flavor instead of letting it turn into wine fumes. (Trust me, you’ll taste the difference.)
Common mistakes when making this recipe
Skipping the Double-Fry
I’ve seen so many cooks rush this step, but the double-fry is what creates that perfect contrast between crispy exterior and tender interior. Some try to cut corners by frying just once, but that leads to uneven cooking—either soggy pork or overcooked edges.
The first fry at 350°F sets the crust, while the second fry at 375°F (after resting) crisps it up again. Trust me, the extra 5 minutes makes all the difference. 🔥
Overcrowding the Pan
This is a rookie mistake that kills crispiness. When you overcrowd the pan, the oil temperature drops, and the pork steams instead of frying. The result? Greasy, soggy pork instead of that golden, crackling crust.
Fry in small batches—I aim for no more than half the pan’s capacity—so each piece gets plenty of room to sizzle and turn golden. Patience here pays off big time.
Using the Wrong Oil
Not all oils are created equal for deep-frying. Peanut or vegetable oil with a high smoke point (400°F+) is ideal, but I’ve seen people use olive oil or butter-based oils that burn at lower temps.
Burnt oil ruins the flavor and can even be dangerous. Keep your oil hot and clear—if it looks cloudy or smells off, replace it. A deep skillet or Dutch oven is best for this recipe.
Skipping the Resting Step
After the first fry, the pork needs to rest for 5-10 minutes before the second fry. This lets the crust set and the juices redistribute. If you skip it, the second fry will turn the pork into a greasy mess.
Use this time to adjust your oil temp—it should be 375°F for the final crisp. Pro tip: Place the pork on a wire rack over a baking sheet to keep it crispy while it rests. ⏰
Not Drying the Pork
Wet pork won’t crisp up—it’s that simple. After marinating, pat every piece dry with paper towels before coating in cornstarch. Even a little moisture can prevent that perfect crust. I like to press the pork between towels if it’s extra juicy.
The cornstarch needs a dry surface to stick and crisp properly. Don’t skip this step, or you’ll end up with sad, limp pork instead of that glorious crunch.
Ignoring the Oil Temp
Temperature control is everything. If your oil isn’t 350°F for the first fry or 375°F for the second, you’re setting yourself up for failure. Too hot? The pork burns on the outside before cooking through. Too cool? It steams and turns greasy.
Invest in a good thermometer—I swear by the ThermoWorks Smoke—and check the temp before adding the pork. A simple test: Drop a small piece in—if it sizzles and floats, you’re golden. 🌡️
Nutrition facts
Frequently asked questions
Can I use pork belly instead of pork shoulder for this recipe?
Pork belly adds a richer, fattier texture that works beautifully in this dish. The key is to trim excess fat and cut it into ½-inch thick slices for even cooking. Since belly has more fat, reduce the frying time to 2-3 minutes per side to avoid overcooking. The result will be extra crispy with a melt-in-your-mouth interior.
What's the best way to make this recipe with an air fryer?
Air fryers can work, but you’ll need to adapt the technique. Start by coating the pork in cornstarch as usual, then air fry at 375°F for 8-10 minutes, shaking the basket every 2 minutes for even crispiness. For extra crunch, spray with oil halfway through. Note: You won’t get the same deep-fried texture, but it’s a great lower-fat alternative that still delivers flavor.
How do I store leftovers to keep them crispy?
Store the pork in an airtight container at room temperature for up to 2 hours (no longer!). For longer storage, refrigerate for 3-4 days. To reheat, place pieces on a wire rack over a baking sheet and broil for 2-3 minutes at 400°F—this reactivates the crust. Avoid microwaving, as it makes the coating soggy.
Can I substitute five-spice powder with individual spices?
Yes! For 1 tbsp five-spice powder, use ½ tsp each of ground star anise, cinnamon, cloves, and fennel seeds (lightly toasted), plus ¼ tsp Szechuan peppercorn (toasted and ground). The blend should be aromatic but balanced—too much of any single spice can overpower the dish. Toast the whole spices first for deeper flavor!
Is this dish gluten-free?
Mostly, but check your ingredients! Traditional soy sauce contains wheat, so use tamari or gluten-free soy sauce instead. Cornstarch is naturally gluten-free, but always verify packaging. For extra safety, substitute with arrowroot powder (though texture may vary slightly). The rest of the recipe is gluten-free by default.